
Email Marketing
The Email Marketing section is used to create, manage, review, and track marketing email campaigns inside JMS.
This workspace helps users monitor campaign performance, manage campaign records, build campaign journeys, review SendGrid templates, and prepare emails before they are sent.
The Email Marketing workspace includes these tabs:
- Dashboard
- Campaigns
- Journeys
- Templates
- Audiences
- Reports
- Activity
Dashboard
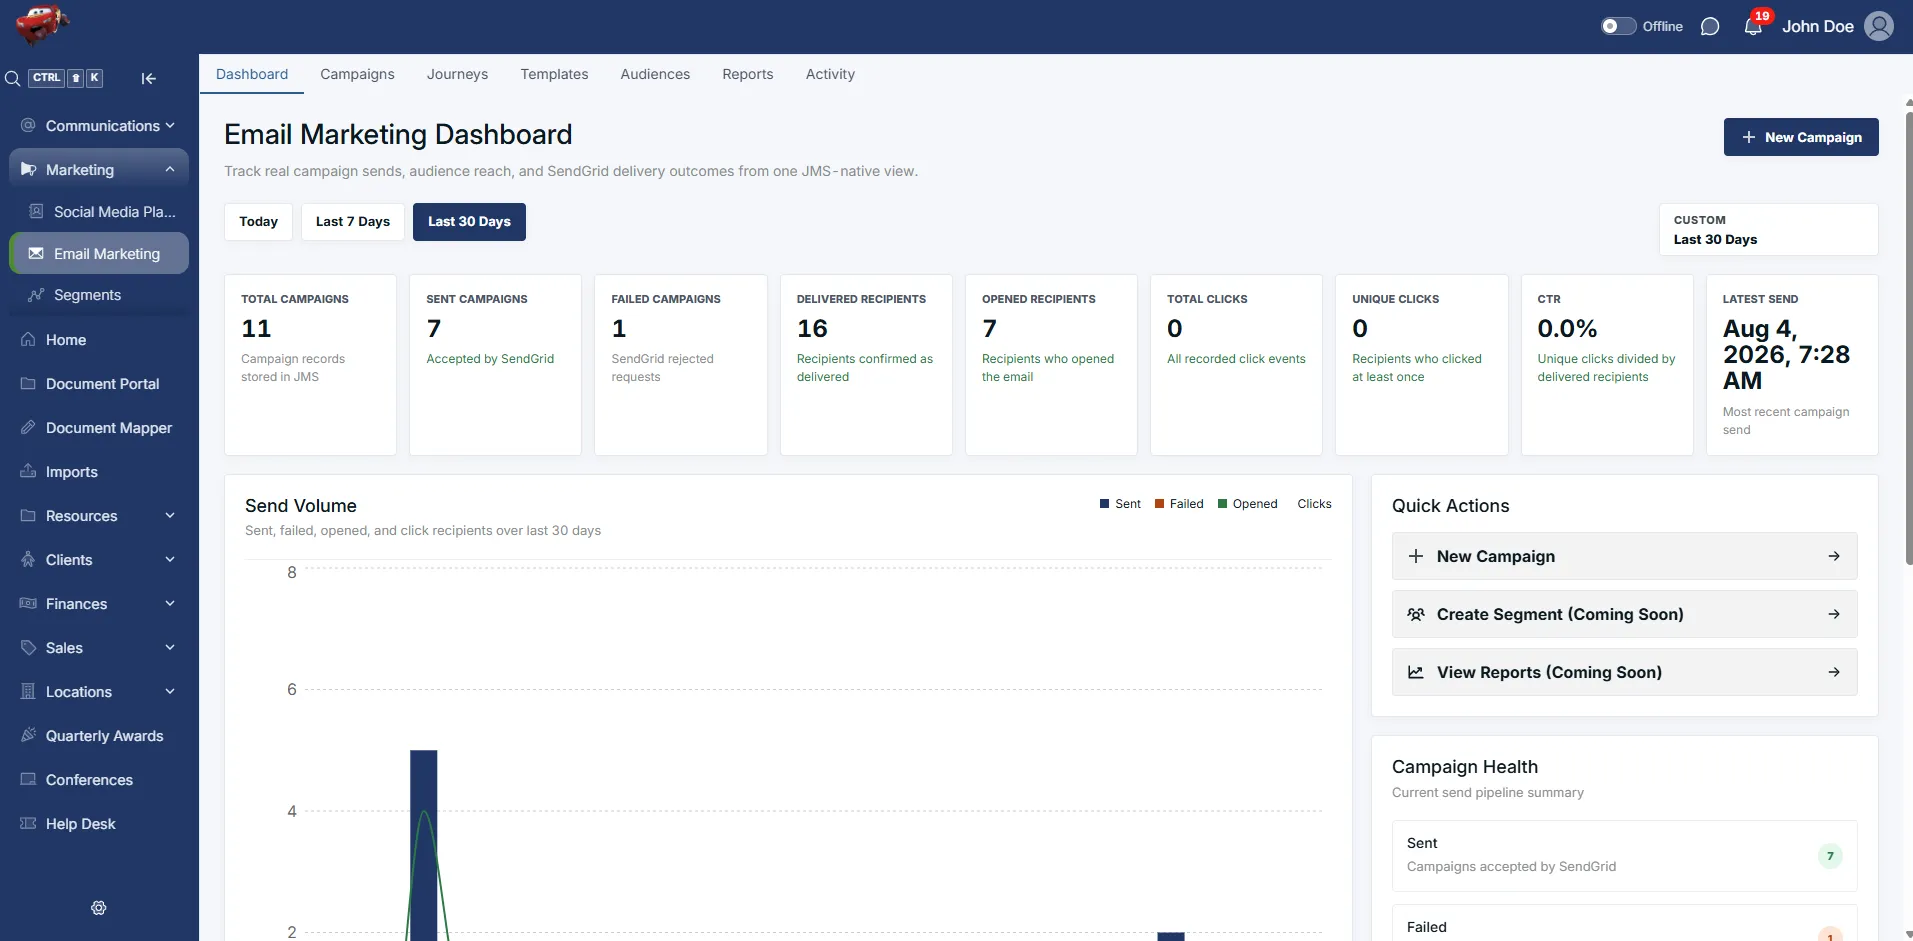
Section titled “Dashboard”The Dashboard tab gives users a quick overview of email campaign activity and SendGrid delivery performance.
Users can use this page to check how campaigns are performing over a selected reporting period.
The dashboard includes:
- Date range filters
- Campaign performance summary cards
- Send volume chart
- Recent campaigns
- Campaign health
- Operational status
- Quick actions
Date Range Filters
Section titled “Date Range Filters”At the top of the dashboard, users can choose a reporting period.
Available options include:
- Today
- Last 7 Days
- Last 30 Days
The selected date range controls the dashboard totals and chart data.
Dashboard Summary Cards
Section titled “Dashboard Summary Cards”The summary cards show the main campaign totals for the selected date range.
These include:
- Total Campaigns: The number of campaign records stored in JMS.
- Sent Campaigns: Campaigns accepted by SendGrid.
- Failed Campaigns: Campaigns rejected or returned as failed.
- Delivered Recipients: Recipients confirmed as delivered.
- Opened Recipients: Recipients who opened the email.
- Total Clicks: All recorded click events.
- Unique Clicks: Recipients who clicked at least once.
- CTR: Click-through rate based on unique clicks and delivered recipients.
- Latest Send: The most recent campaign send date and time.
These cards help users quickly understand campaign performance without opening each campaign.
Send Volume
Section titled “Send Volume”The Send Volume chart shows email activity over the selected date range.
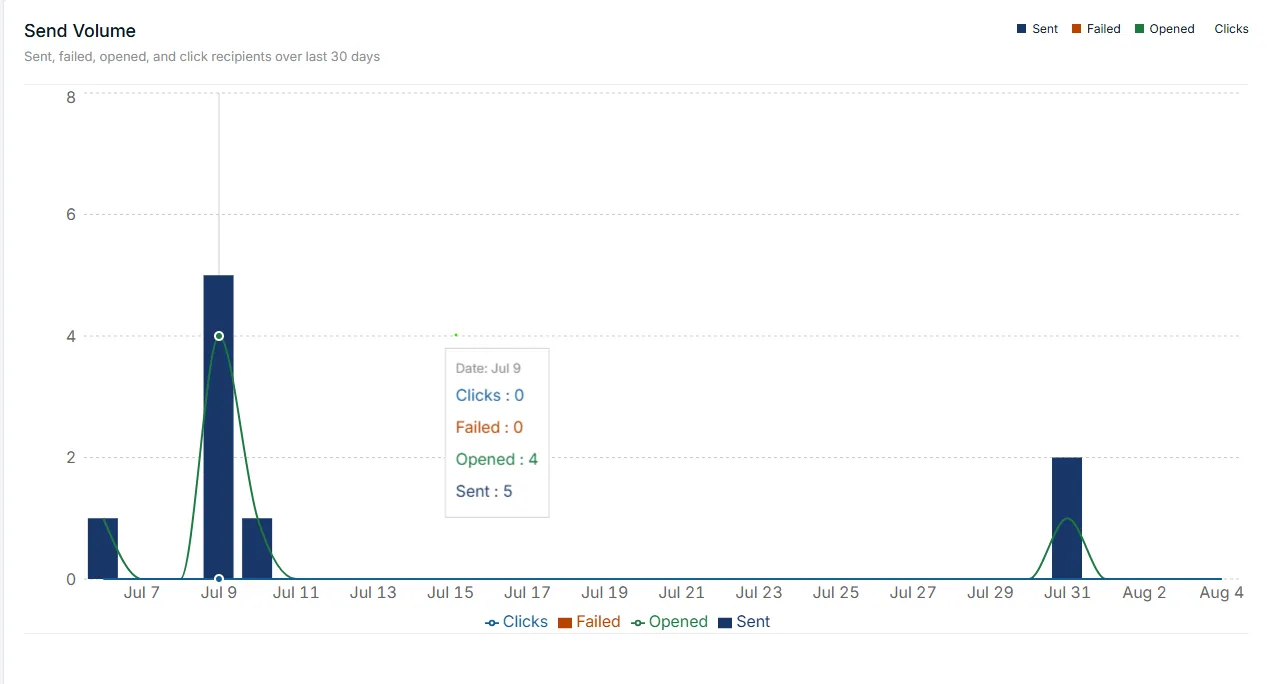
The chart can show:
- Sent
- Failed
- Opened
- Clicks
This helps users see whether campaigns are being delivered, opened, and clicked.
Campaign Health
Section titled “Campaign Health”The Campaign Health panel shows the current send pipeline summary.
It includes:
- Sent: Campaigns accepted by SendGrid.
- Failed: Campaigns that returned an error.
- Sending: Campaigns currently being processed.
- Success Rate: Recipient-level send success.
This section helps users quickly confirm whether campaign sending is healthy.
Operational Status
Section titled “Operational Status”The Operational Status panel shows whether campaign activity and SendGrid health are working as expected.
If there are no send failures, the panel shows that campaigning is healthy.
Recent Campaigns
Section titled “Recent Campaigns”The Recent Campaigns table shows the latest campaign records.
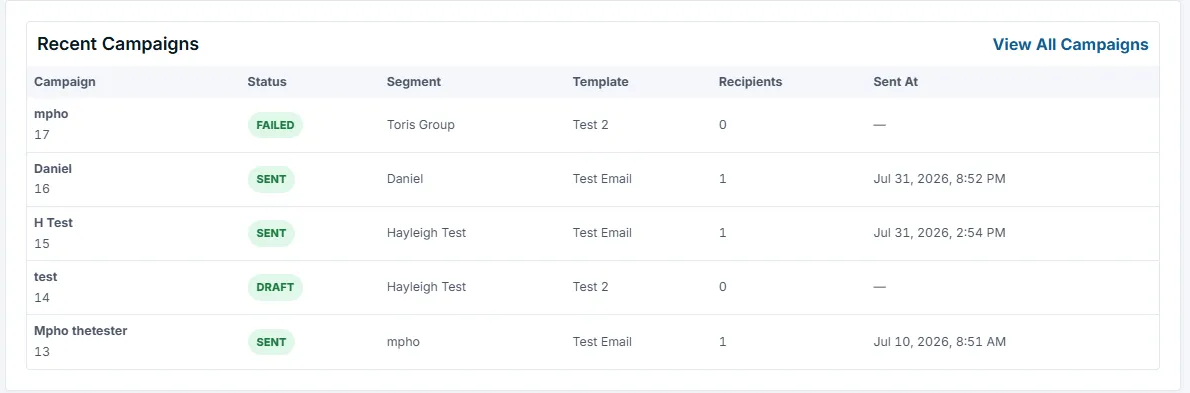
The table includes:
- Campaign
- Status
- Segment
- Template
- Recipients
- Sent At
Users can click View All Campaigns to open the full Campaigns list.
Quick Actions
Section titled “Quick Actions”The Quick Actions panel gives shortcuts to common email marketing tasks.
Available actions include:
- New Campaign: Opens the campaign creation flow.
- Create Segment: Shown as coming soon.
- View Reports: Shown as coming soon.
Users can also click New Campaign in the top-right corner of the dashboard.
Creating a New Campaign
Section titled “Creating a New Campaign”To create a new campaign, click New Campaign.
The system opens the Campaign Configuration page.
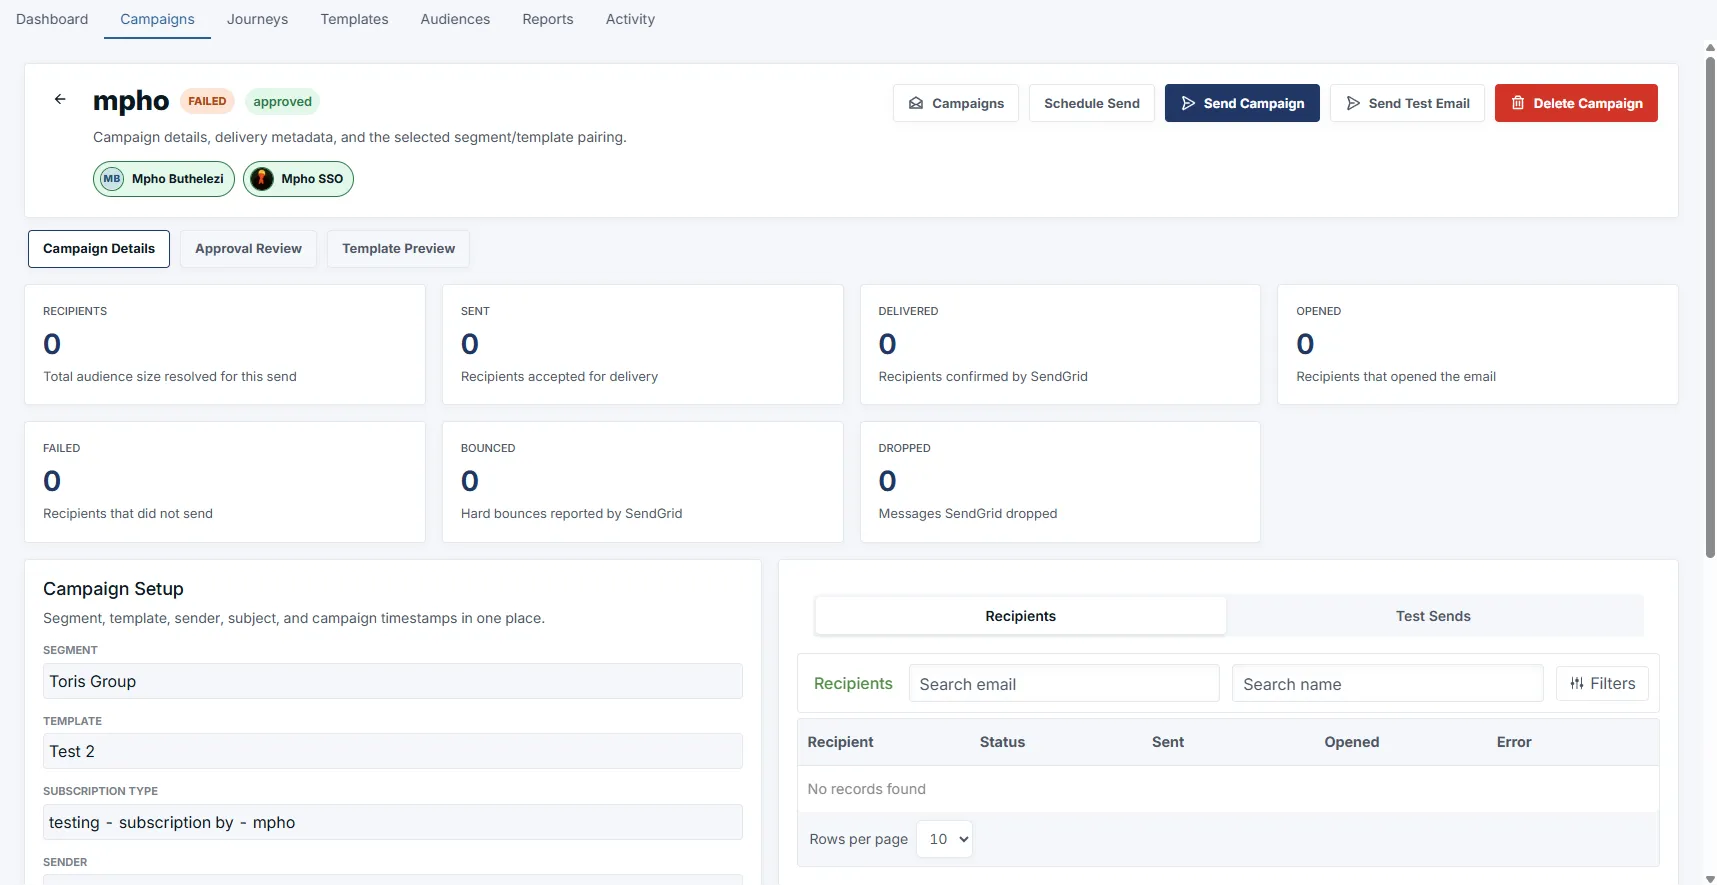
The configuration page is where users prepare the campaign before it is saved or sent for review.
At the top of the page, status indicators show what has already been completed and what still needs attention.
Examples include:
- Audience
- Template
- Subject missing
These indicators help users see whether the required campaign setup is complete.
Campaign Details
Section titled “Campaign Details”The Campaign Details section is where users add the main campaign information.
Users can complete:
- Campaign Name
- Subject Line
- Preview Text
The campaign name is used inside JMS.
The subject line is what recipients will see in their inbox.
The preview text is the short inbox preview shown by some email clients.
Audience and Template
Section titled “Audience and Template”The Audience and Template section controls who receives the campaign and which SendGrid template is used.
Add screenshot: Audience and Template section
This section includes:
- Subscription Type
- Segment
- SendGrid Template
The selected segment shows the recipient count, so users can confirm how many people will receive the campaign.
Recipients must be opted into the selected subscription type before they can receive the email.
Sender
Section titled “Sender”The Sender section shows the sender profile that will be used for the campaign.
This includes the sender name and email address.
Users should confirm that the correct sender is selected before saving or sending the campaign for review.
Template Preview
Section titled “Template Preview”The Template Preview section shows how the selected SendGrid template may render inside JMS.
The preview may show the campaign content, selected template, sample recipient, and campaign data.
If no rendered content is returned for the selected template, JMS displays a message explaining that no rendered template content was returned.
The preview is approximate and may differ slightly from the final SendGrid output if the template uses more complex logic.
Campaign Summary Fields
Section titled “Campaign Summary Fields”Below the preview, JMS shows campaign summary fields.
These can include:
- campaignName
- subject
- previewText
- sender
- sampleRecipient
- recipientCount
These fields help users confirm the campaign data before saving or submitting the campaign.
Save Draft
Section titled “Save Draft”Click Save Draft when the campaign is not ready to submit yet.
This allows the campaign to be saved and completed later.
Send for Review
Section titled “Send for Review”Click Send for Review when the campaign is ready for approval.
Before sending for review, users should confirm that:
- The campaign name is correct.
- The subject line is complete.
- The preview text is clear.
- The correct subscription type is selected.
- The correct segment is selected.
- The correct SendGrid template is selected.
- The sender profile is correct.
- The preview and recipient count look correct.
Campaigns
Section titled “Campaigns”The Campaigns tab shows the full campaign list.
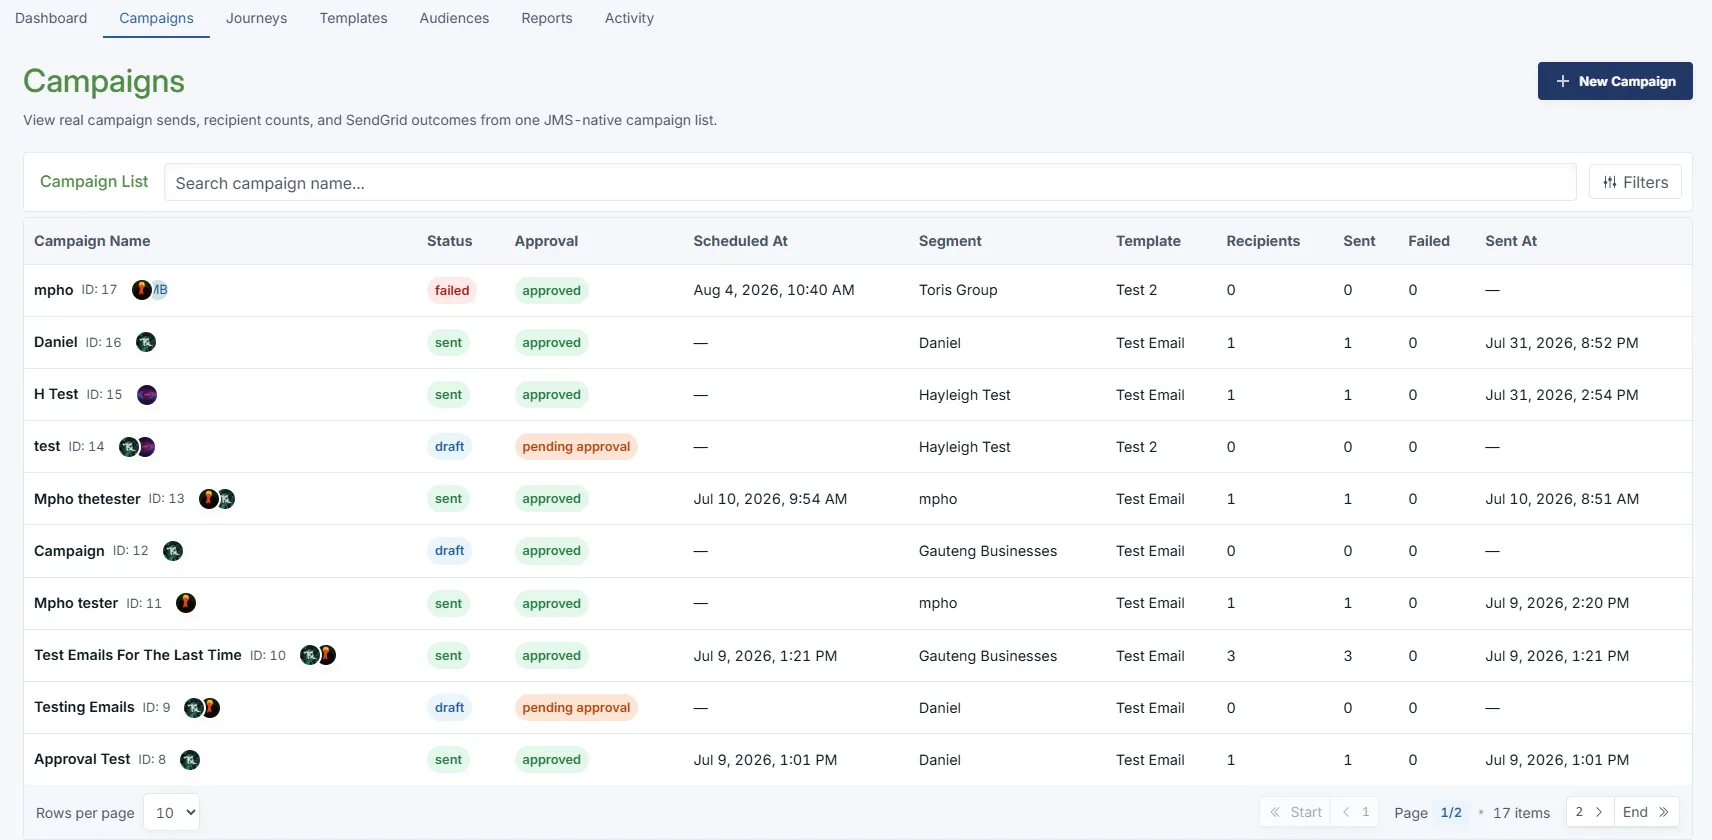
Users can use this page to view campaign records, check campaign status, and review SendGrid outcomes.
The campaign list includes:
- Campaign Name
- Status
- Approval
- Scheduled At
- Segment
- Template
- Recipients
- Sent
- Failed
- Sent At
Campaign Status
Section titled “Campaign Status”Campaigns can have different statuses, such as:
- Draft
- Sent
- Failed
- Scheduled
The status helps users understand where the campaign is in the sending process.
Approval Status
Section titled “Approval Status”The Approval column shows whether a campaign has been approved or is still waiting for approval.
Examples include:
- Approved
- Pending approval
Searching Campaigns
Section titled “Searching Campaigns”Users can search for a campaign by using the Search campaign name field.
This is useful when there are many campaign records.
Filtering Campaigns
Section titled “Filtering Campaigns”Users can click Filters to narrow down the campaign list.
Filters help users find campaigns by status, approval state, or other available campaign criteria.
Campaign Pagination
Section titled “Campaign Pagination”At the bottom of the table, users can change the number of rows shown per page and move between pages.
This helps users browse larger campaign lists.
Journeys
Section titled “Journeys”The Journeys tab is used to build rule-based marketing journeys.
Add screenshot: Journeys tab
Journeys help users automate marketing actions based on segments, time, engagement, and operational events.
Users can use journeys to create automated flows such as onboarding messages, follow-ups, reminders, and internal notifications.
Journey Summary Cards
Section titled “Journey Summary Cards”At the top of the Journeys page, users can see summary cards.
These include:
- Total Journeys
- Active
- Drafts
- Email Steps
- Branch Nodes
These cards give users a quick overview of the journey setup.
Mock Journey Library
Section titled “Mock Journey Library”The Mock Journey Library shows sample journeys that users can review or build from.
Examples can include:
- Onboarding nurture
- Payroll implementation follow-up
- Client risk save
Each journey card can show the journey name, status, segment, and number of steps.
Journey Details
Section titled “Journey Details”The Journey Details section is used to define the main information for a journey.
Users can review or update:
- Journey name
- Owner
- Status
- Description
- Activation
The activation toggle controls whether the journey is active or not.
Approval Panel
Section titled “Approval Panel”The Approval Panel shows whether the journey is ready for review.
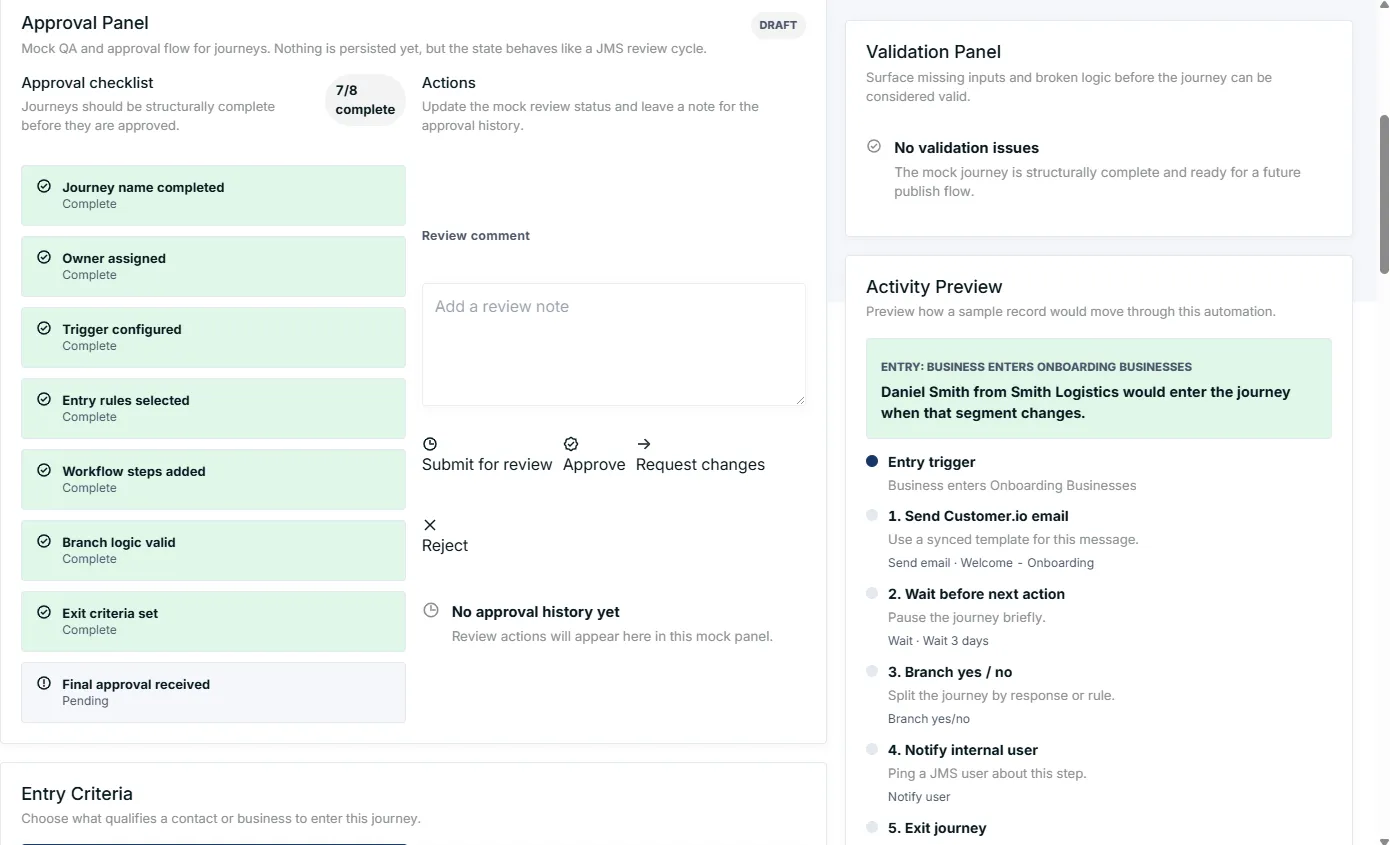
It can include an approval checklist and actions for review comments.
This helps users confirm that a journey is complete before it is approved.
Validation Panel
Section titled “Validation Panel”The Validation Panel checks for missing inputs or broken logic.
If the journey is structurally complete, the panel shows that there are no validation issues.
Activity Preview
Section titled “Activity Preview”The Activity Preview shows how a sample record would move through the journey.
It helps users understand the journey flow before the automation is used.
The preview can show:
- Entry trigger
- Email steps
- Wait steps
- Branch steps
- Internal notifications
- Exit journey step
Entry Criteria
Section titled “Entry Criteria”The Entry Criteria section controls how a contact or business enters a journey.
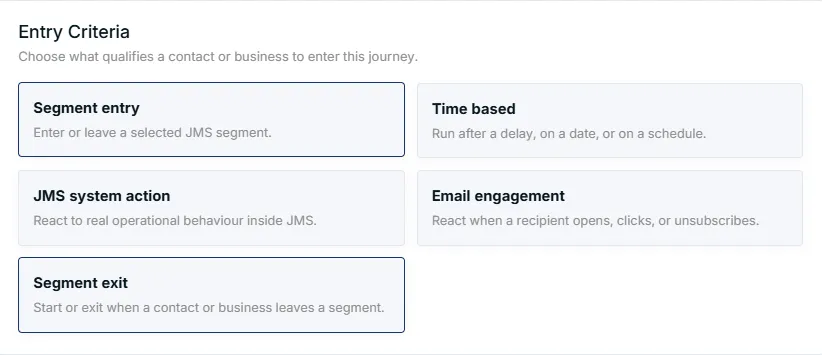
Available entry criteria can include:
- Segment entry
- Time based
- JMS system action
- Email engagement
- Segment exit
Users should choose the entry type that matches the automation goal.
Trigger Rules
Section titled “Trigger Rules”The Trigger Rules section configures the selected entry criteria.
For example, a segment entry rule can include:
- Audience type
- Segment
- Direction
This controls which records enter the journey and when they enter.
Workflow Steps
Section titled “Workflow Steps”The Workflow Steps section is used to build the actions that happen inside the journey.
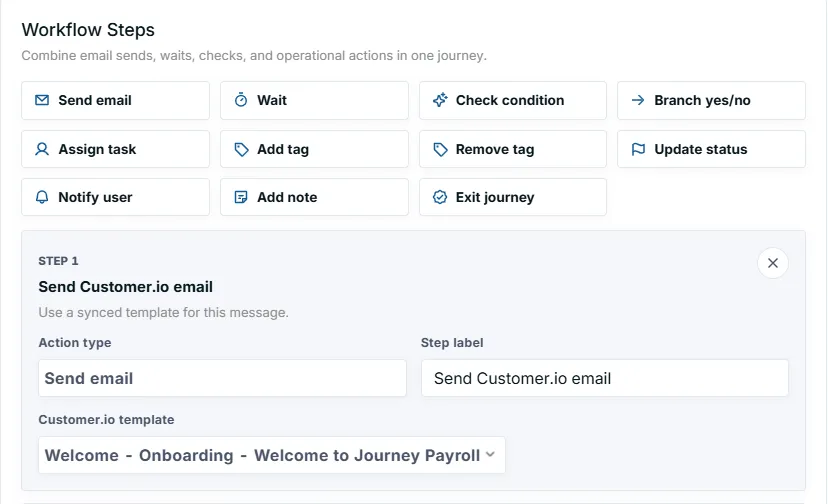
Available workflow steps include:
- Send email
- Wait
- Check condition
- Branch yes/no
- Assign task
- Add tag
- Remove tag
- Update status
- Notify user
- Add note
- Exit journey
These steps allow users to build automated marketing and operational flows.
Send Email Step
Section titled “Send Email Step”The Send email step sends a selected email template to the record in the journey.
Users can configure:
- Action type
- Step label
- Customer.io template
Wait Step
Section titled “Wait Step”The Wait step pauses the journey before the next action happens.
Users can configure:
- Action type
- Step label
- Wait amount
- Wait unit
For example, the journey can wait 3 days before continuing.
Branch Yes/No Step
Section titled “Branch Yes/No Step”The Branch yes/no step splits the journey based on a condition.
Add screenshot: Branch yes/no step
Users can configure:
- Condition
- Yes path label
- No path label
For example, the journey can check whether an email was opened in the last 7 days.
If yes, the contact can continue the nurture flow.
If no, the system can send a reminder.
Notify User Step
Section titled “Notify User Step”The Notify user step sends an internal notification to a JMS user.
Users can configure:
- Action type
- Step label
- Notify user
This is useful when a team member needs to take action.
Exit Journey Step
Section titled “Exit Journey Step”The Exit journey step removes the record from the workflow.
This is normally used at the end of the journey.
Branch Conditions
Section titled “Branch Conditions”The Branch Conditions section shows the yes/no logic for the branch step.
Add screenshot: Branch Conditions section
It displays:
- The branch condition
- The Yes path
- The No path
This helps users understand what happens when the condition is true or false.
Exit Criteria
Section titled “Exit Criteria”The Exit Criteria section controls when a record should stop receiving journey actions.
Add screenshot: Exit Criteria section
Exit criteria can include:
- Goal reached
- Leaves selected segment
- Unsubscribes
- Manual exit
- Max step count reached
Users can switch criteria on or off depending on when the journey should stop for a contact or business.
Templates
Section titled “Templates”The Templates tab shows the live SendGrid dynamic templates available for email marketing campaigns.
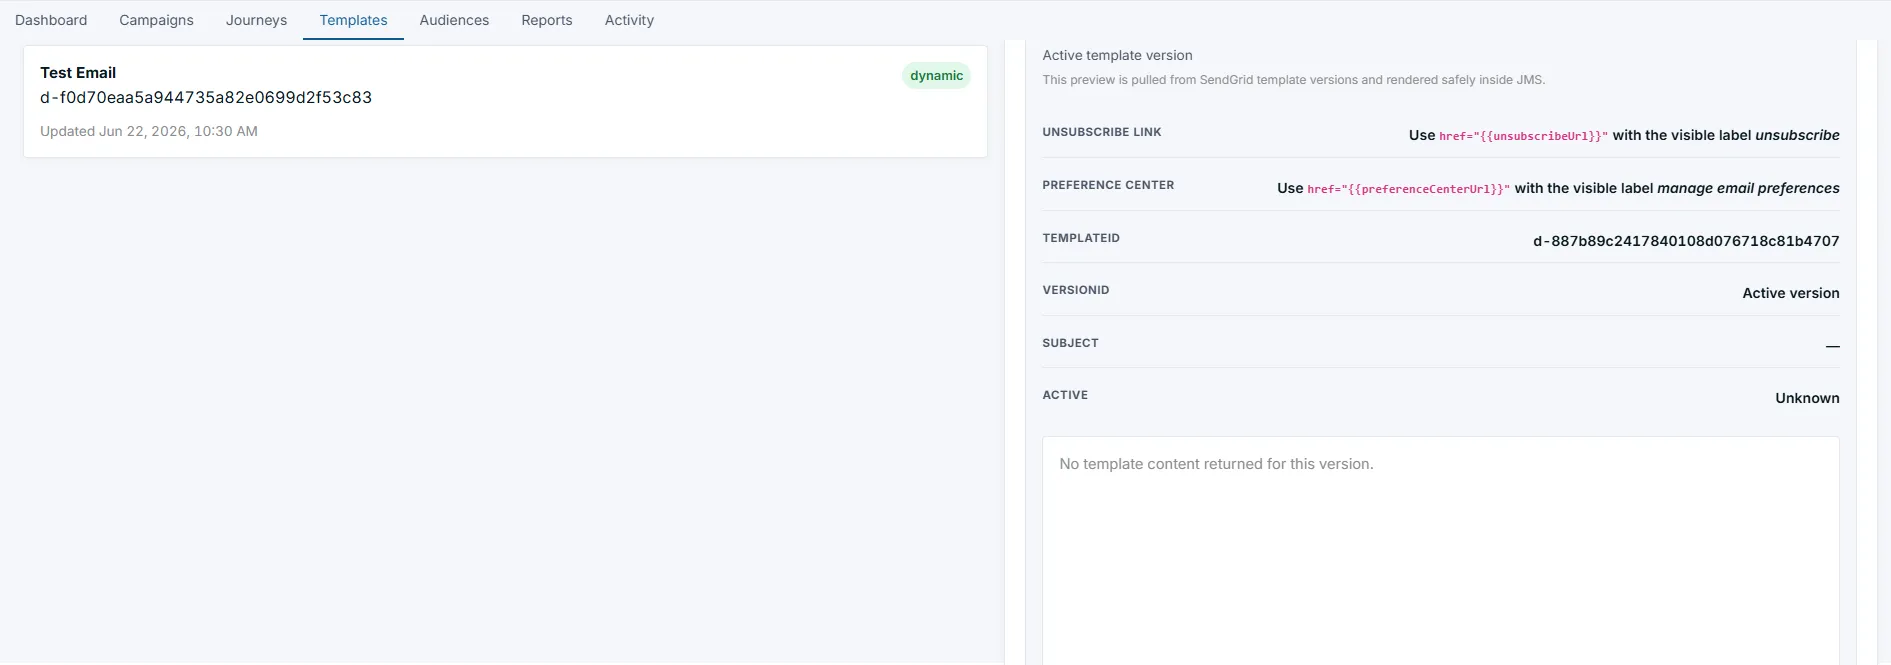
Users can use this page to review available templates and confirm which templates can be used in campaigns.
Template List
Section titled “Template List”The template list shows available SendGrid templates.
Each template can show:
- Template name
- Template ID
- Last updated date
- Template type, such as dynamic
Template Preview
Section titled “Template Preview”The Template Preview panel shows the active SendGrid version rendered inside JMS.
The preview can show:
- Template name
- Active template version
- Unsubscribe link requirements
- Preference center link requirements
- Template ID
- Version ID
- Subject
- Active status
- Rendered template content
If no template content is returned, JMS shows a message explaining that no template content was returned for that version.
Edit in SendGrid
Section titled “Edit in SendGrid”Click Edit in SendGrid to open the template inside SendGrid.
This allows users with the correct access to update the email template directly in SendGrid.
How Email Marketing connects to Segments
Section titled “How Email Marketing connects to Segments”Email Marketing works together with Segments.
Segments define who should receive the campaign, and Email Marketing controls the message, template, sender, and campaign review process.
In simple terms:
- Segments decide who receives the email.
- Templates define the email layout and content.
- Campaigns manage the actual email send.
- Journeys automate follow-up actions.
- Reports help users review performance.