Business
The Businesses page is where users manage business records in JMS.
This page gives a clear overview of the businesses currently stored in the system. It helps users see how many businesses exist, how much revenue has been recorded, how many clients are active, and how many businesses have been onboarded during the current month.
The top summary cards show:
- Total Businesses: The total number of business records in the system.
- Total Revenue: The total revenue connected to the listed businesses.
- Active Clients: Businesses that are currently active clients.
- Onboarded this month: Businesses that have completed onboarding during the current month.
Below the summary cards is the Business List. This table shows the main business records and includes important information such as:
- Business name
- Total revenue
- Total profit
- Last run date
- Last updated date
- Current status
The status helps users quickly understand where each business is in the process. For example, a business may be marked as New, Active, or Closed Won.
Users can use the Search name field to quickly find a specific business. The Filters button can be used to narrow the list down further when there are many records.
Actions menu
Section titled “Actions menu”The Actions button in the top-right corner provides extra tools for managing business records.
The available actions include:
- Import: Add business records into the system from an external file.
- Export: Download business information from the system.
- View Archive: Open archived business records.
- Add Business: Create a new business record.
- Reassign: Move business ownership from one user to another.
Adding a new business
Section titled “Adding a new business”When users select Add Business, a form opens where they can create a new business record.
The only required field is Business Name. Other fields are optional and can be added if the information is available.
The form includes:
- Business basics: Add the business name and optional primary contact person.
- Contact details: Add a phone number or mark it as the same as the contact.
- Address: Add street, city, state, and zip code details.
- Social: Add a LinkedIn profile link if available.
At the bottom of the form, users can choose to:
- Cancel: Close the form without saving.
- Add & Create New: Save the business and immediately start another new business.
- Add & View: Save the business and open its record.
- Add Business: Save the business record.
Reassigning businesses
Section titled “Reassigning businesses”The Reassign option is used when businesses need to be moved from one owner to another.
This is useful when responsibilities change, a salesperson leaves, or businesses need to be redistributed between team members.
The reassignment process has three steps:
-
Choose current owner Select the user who currently owns the business records.
-
Choose new owner Select the user who should receive the business records.
-
Choose businesses Select which businesses should be reassigned.
Only users who already have assigned businesses will appear in the current owner list. After the correct selections are made, the user can click Reassign to complete the change.
Business record side panel
Section titled “Business record side panel”When a business record is opened, the left side panel stays available while the user moves through the business sections.
The side panel includes two main areas:
- Menu
- Information
The Menu allows users to move between the different parts of the business record, including:
- Overview
- Tasks & Activities
- Services & Billing
- Document Checklist
- Implementation
- Client Information
- Recent Documents
- Partner Contacts
The selected menu item is highlighted so the user can clearly see which section they are viewing.
Business information panel
Section titled “Business information panel”The Information area shows important business details that remain visible while working in the record.
This includes fields such as:
- Industry Type
- Address
- Website
- Employees
- Priors
- Frequency
- Specific Source
- Competitor
These fields help users quickly confirm the business setup without needing to leave the current section.
Implementation Turnaround Estimator
Section titled “Implementation Turnaround Estimator”The Implementation Turnaround Estimator helps users understand the expected onboarding time for the business.
When expanded, it shows details such as:
- Number of employees
- Number of priors
- Estimated turnaround time
- Employee band
- Turnaround profile being used
- Priors used in the calculation
This is useful when estimating how long implementation may take based on the business size and setup. For example, a business with 20 employees and 0 priors may show an estimated turnaround of 2 days under the default turnaround matrix.
Journey Team
Section titled “Journey Team”The Journey Team section shows the internal users connected to the business.
Each team member displays their name, email address, and assigned role, such as:
- CSS
- Franchise Owner
- Inside Sales
- Outside Sales
Users can click Add New to add another team member. A user selection window opens, allowing the user to search for and select an internal user.
After the user is added, their role can be selected from the role menu. This helps define what responsibility the user has on the business record.
Franchise
Section titled “Franchise”The Franchise section shows the franchise connected to the business.
In the example shown, the business is linked to HQ. If no franchise owner email is available, the system displays No franchise owner email.
Contacts
Section titled “Contacts”The Contacts section shows the contacts linked to the business record.
Each contact displays:
- Name
- Email address
- Contact type
Users can click Add New to add another contact. The three-dot menu beside a contact can be used to remove the contact from the business record when needed.
Filtering the business list
Section titled “Filtering the business list”The Filters button helps users narrow down the Business List when there are many records.
When users click Filters, a side panel opens with filter groups. These groups make it easier to find businesses by specific details instead of scrolling through the full list.
The filter groups include:
- Classification: Filters businesses by their type, category, or current business classification.
- Source & Competition: Filters by where the business came from, such as a lead source, referral, or competitor-related information.
- Date Filters: Filters businesses by dates, such as when they were created, updated, or last active.
- Performance: Filters by business results, revenue, profit, activity, or other performance-related values.
- Geography & People: Filters by location, assigned users, owners, or people connected to the business.
Each filter group can be opened to show more options. Users can select the filters they need, then review a smaller and more focused list of businesses.
This is useful when users want to find a specific group of businesses, such as new businesses, active clients, businesses from a certain source, or businesses assigned to a specific person.
Business list
Section titled “Business list”The Business List shows all businesses that have been added to the system.
Users can use this list to quickly review business records without opening each one individually. The table includes the business name, revenue, profit, last payroll run date, last updated date, and current status.
The Search name field helps users find a business faster by typing part of the business name. The Filters button can be used to narrow the list further when there are many records.
Each business row can be selected to open the full business profile. This is where users can view the business details, update information, check progress, and manage the next steps in the sales or onboarding process.
Opening a business profile
Section titled “Opening a business profile”Clicking a business name opens the full business record.
The business profile gives users one central place to manage the client or prospect. At the top of the page, users can see the business name, current status, primary contact, and quick action buttons.
From this page, users can:
- Start a meeting
- Make a Teams call
- Send an email
- Archive the business
- Update the business status
- Resend the Magic Link
- Review the business timeline
- Add or review comments
- Check important business and client details
Business overview
Section titled “Business overview”The Overview page gives a summary of the selected business.
Users can see key dates such as the closed date, last run date, last contacted date, and next run date. They can also review the lead source, operating states, client number, outside advisors, and the current business status.
The left side menu gives access to other areas of the business record, including tasks, services and billing, document checklist, implementation, client information, recent documents, and partner contacts.
This helps users keep the business record organized and makes it easier to continue the sales or onboarding process from one place.
Journey team and contacts
Section titled “Journey team and contacts”The business profile also shows the Journey Team and Contacts linked to the business.
The Journey Team section shows internal users who are involved with the business, such as sales, CSS, or other assigned team members. Users can add new team members when more people need to help with the account.
The Contacts section shows the people connected to the business. These contacts may include the main client contact, partner contacts, or other people involved in the account.
This helps users understand who is responsible internally and who should be contacted externally.
Tasks and activities
Section titled “Tasks and activities”The Tasks & Activities section is used to track work that still needs to be completed for the selected business.
This page helps users manage follow-up work, assign responsibilities, and make sure important sales or onboarding actions are not missed. Tasks are shown in a table with the task name, assigned user, status, priority, and due date.
Users can use the Search for tasks field to quickly find a task. The Filters button can be used to narrow the task list when there are many tasks.
Creating a task
Section titled “Creating a task”To create a new task, open the menu on the right side of the task toolbar and select Create Task.
The New Task window allows the user to enter the task details. The required field is the task title. Users can also add a summary, select one or more assignees, choose a due date, set the task status, and set the priority.
A task can also include subtasks if the work needs to be broken into smaller steps. After the details are completed, select Save Task to add it to the task list.
Once saved, the task appears in the table under All Tasks, where users can track who it is assigned to, whether it is pending or complete, the priority level, and the due date.
Business status and next steps
Section titled “Business status and next steps”At the top of the business record, users can manage the business status.
The main status dropdown shows the current sales or onboarding stage, such as Qualified. The More Statuses menu gives additional options, including Close, Not Interested, Disqualified, and Lost.
These statuses help users keep the business pipeline accurate. For example, if the business is no longer moving forward, the user can update the record to show why it is not continuing.
Resending the Magic Link
Section titled “Resending the Magic Link”The Resend Magic Link button is used when the client needs another link to access the document portal.
When selected, the system asks whether the user wants to open the Document Portal as well or only send the link. Choose No, just send link to resend the link without opening the portal, or choose Yes, Open it to open the portal after sending.
The progress tracker updates once the Magic Link has been resent. This helps users confirm that the business has moved forward in the process and that the client has been given access to the required document portal.
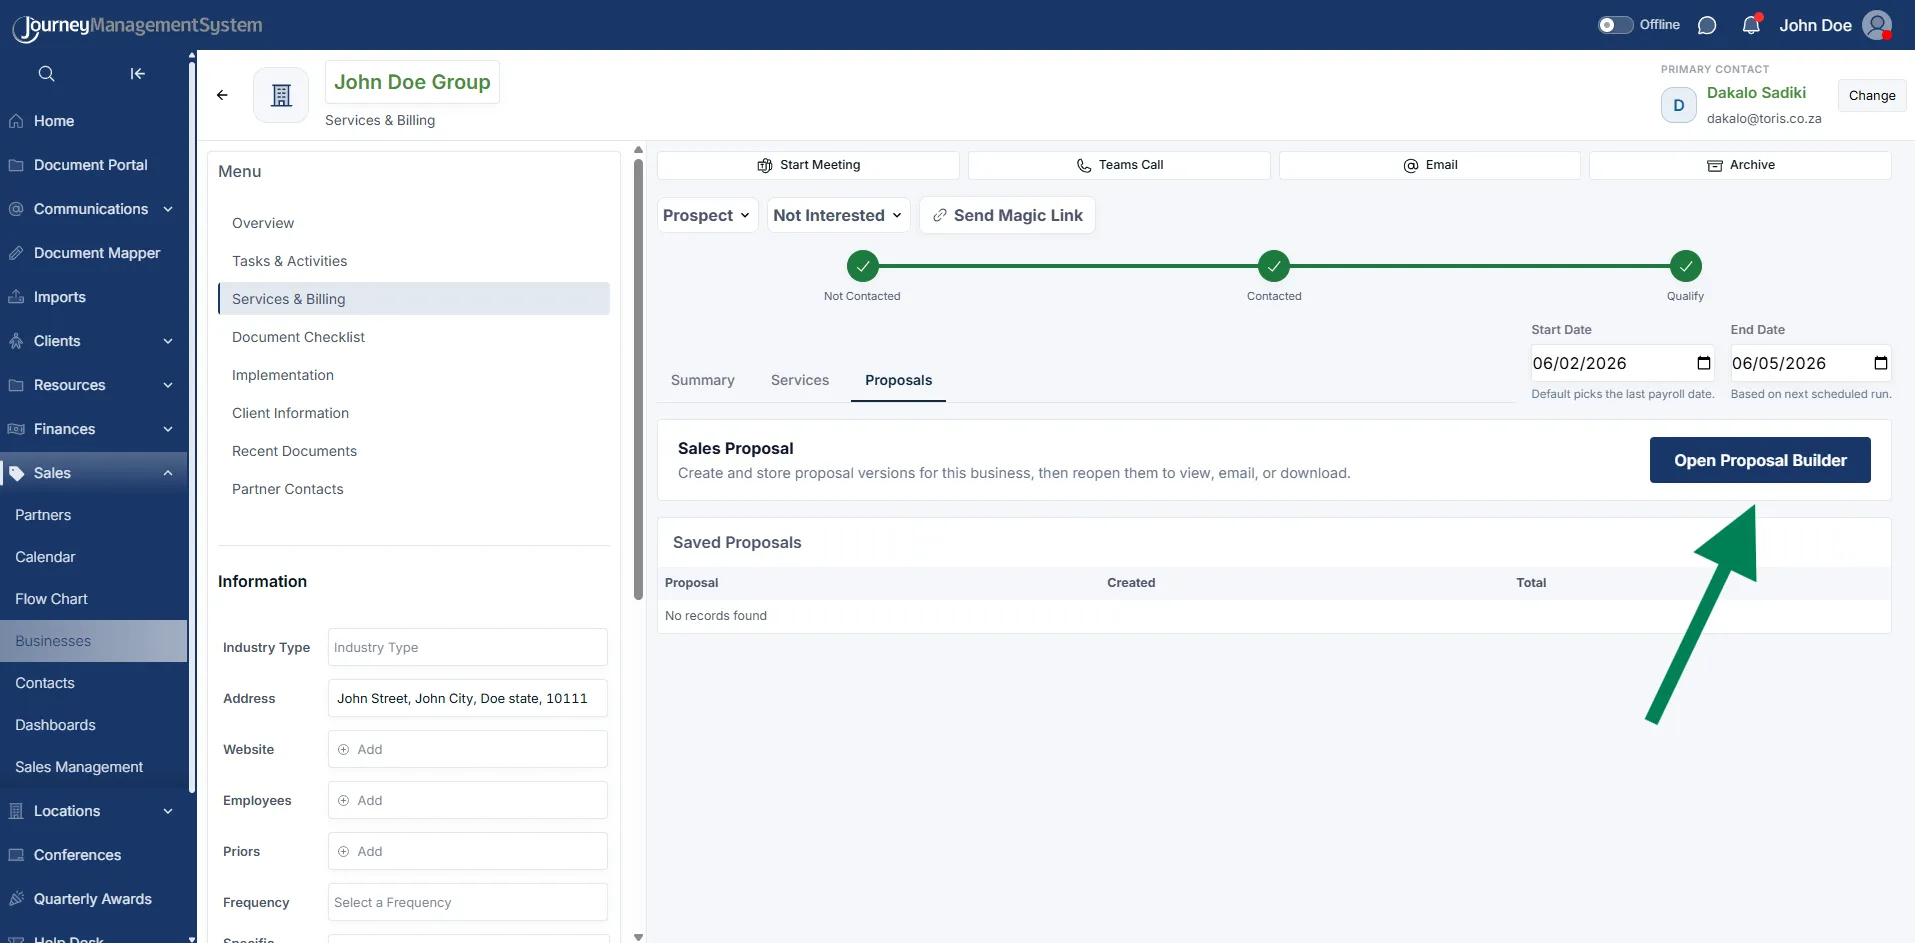
Services and billing
Section titled “Services and billing”The Services & Billing section is used to manage the services, charges, and proposal details for the selected business.
This area helps users confirm what the client will be billed for before a proposal is sent. It includes both recurring services and once-off services, so the user can review monthly or ongoing charges separately from one-time setup or implementation charges.
At the top of the page, the user can still access the main business actions, including Start Meeting, Teams Call, Email, and Archive. The status controls and Resend Magic Link button also remain available, so the user can continue managing the sales process without leaving the business record.
Summary tab
Section titled “Summary tab”The Summary tab gives a quick billing overview for the business.
It shows total amounts by service category, such as common add-ons, franchise non-billable items, hard costs, payroll charges, time clock charges, and other add-ons. Each card shows the current total for that category and how many active items are included.
The start and end date fields are used to define the billing period. The start date usually defaults to the last payroll date, while the end date is based on the next scheduled run.
Services tab
Section titled “Services tab”The Services tab is where users review and select the services that may be included in the client proposal.
Services are grouped into sections, such as Common Add-Ons, Franchise Non-Billable, hard cost, mpho cost, and Time Clock. Each group can be opened to view the available items inside it.
Users can switch between Recurring and Once-off services. Recurring services are charges that repeat, while once-off services are charged only once.
Proposal builder
Section titled “Proposal builder”The Open Proposal Builder button opens the proposal builder in a popup.
The proposal builder allows users to customize the proposal before it is sent to the client. Users can select or remove services, update pricing, apply discounts, change billing units, and add custom line items.
The builder also shows a running total, including the recurring amount, once-off amount, and total estimated cost. This helps users check the proposal value before generating the final proposal document.
If the proposal needs a charge that is not already listed in the selected services, click + Add Custom Line. A new row is added where the user can enter the item name, add an optional description, choose the charge type, select the billing unit, enter the unit price, apply a discount if needed, and set the quantity.
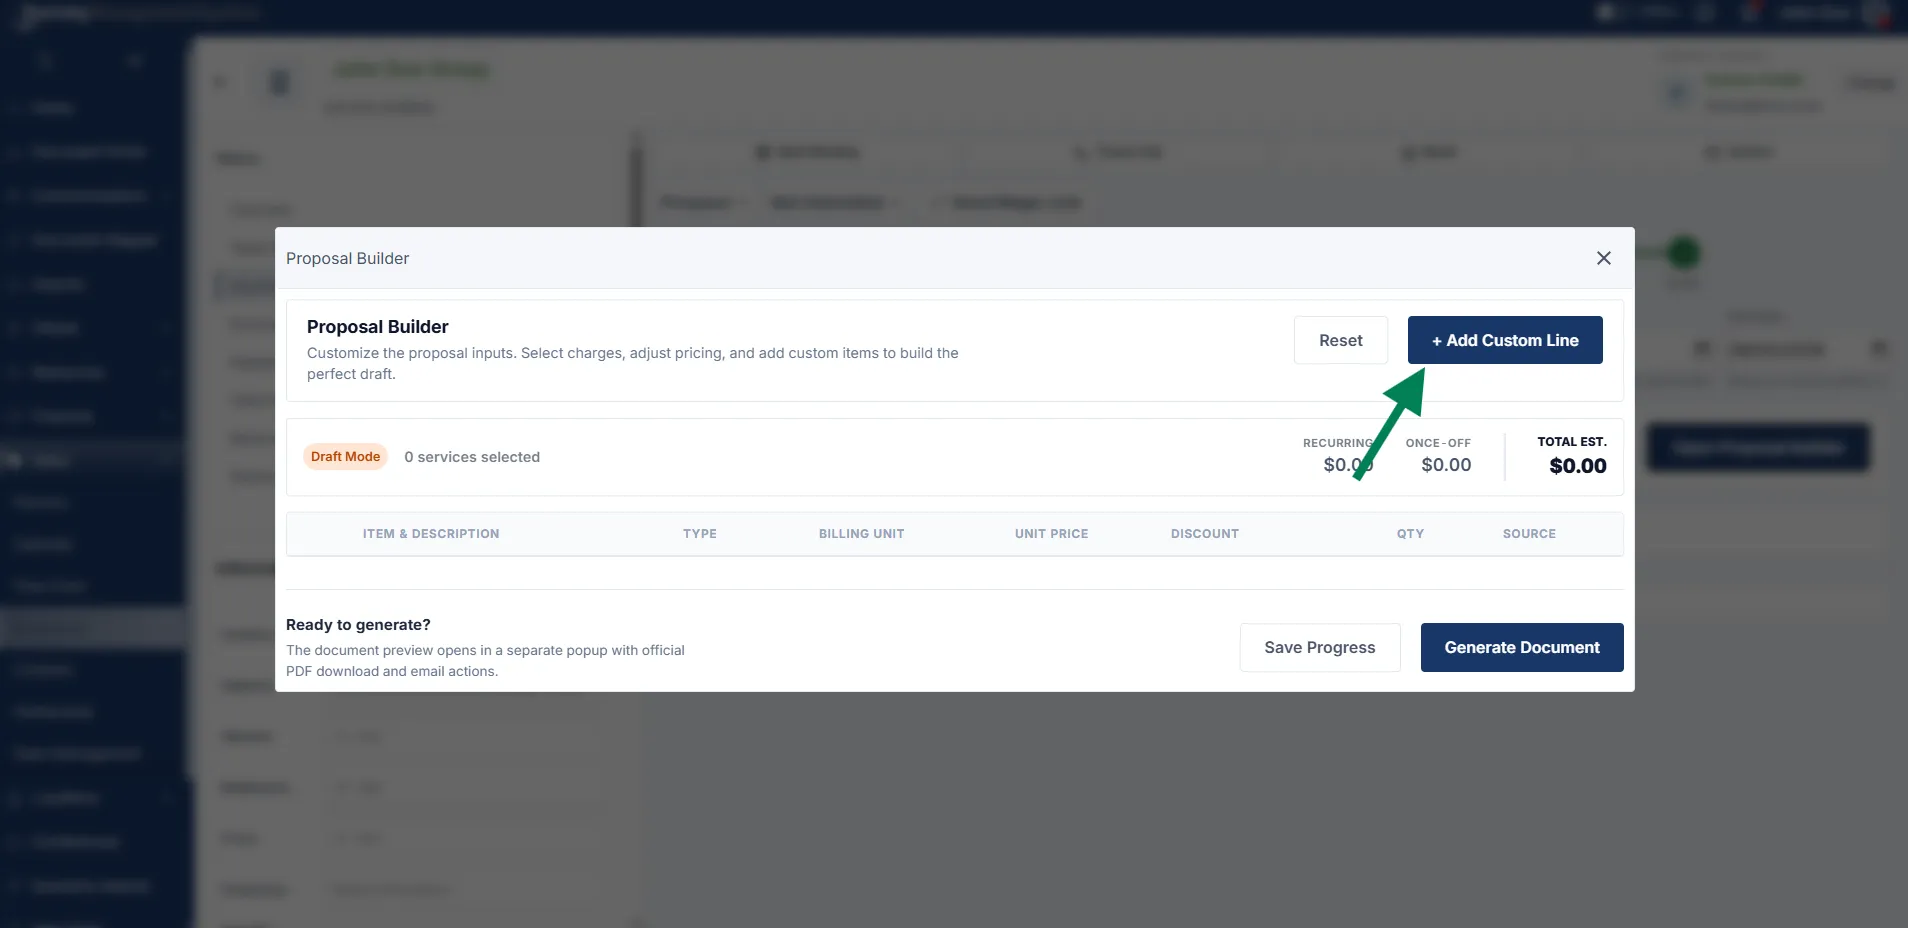
When a proposal line is added, the checkbox at the start of the row controls whether that line is included in the draft. The totals at the top update as the user changes the price, quantity, discount, or service type.
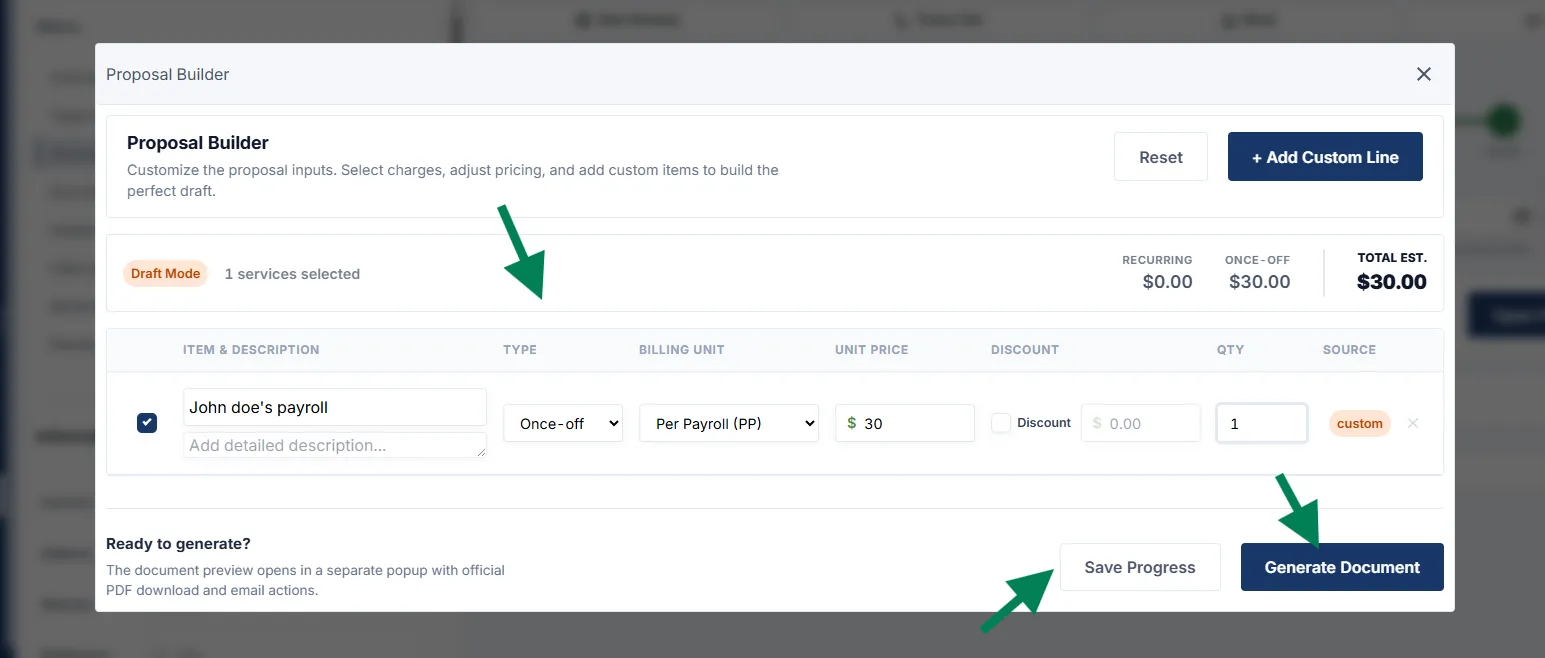
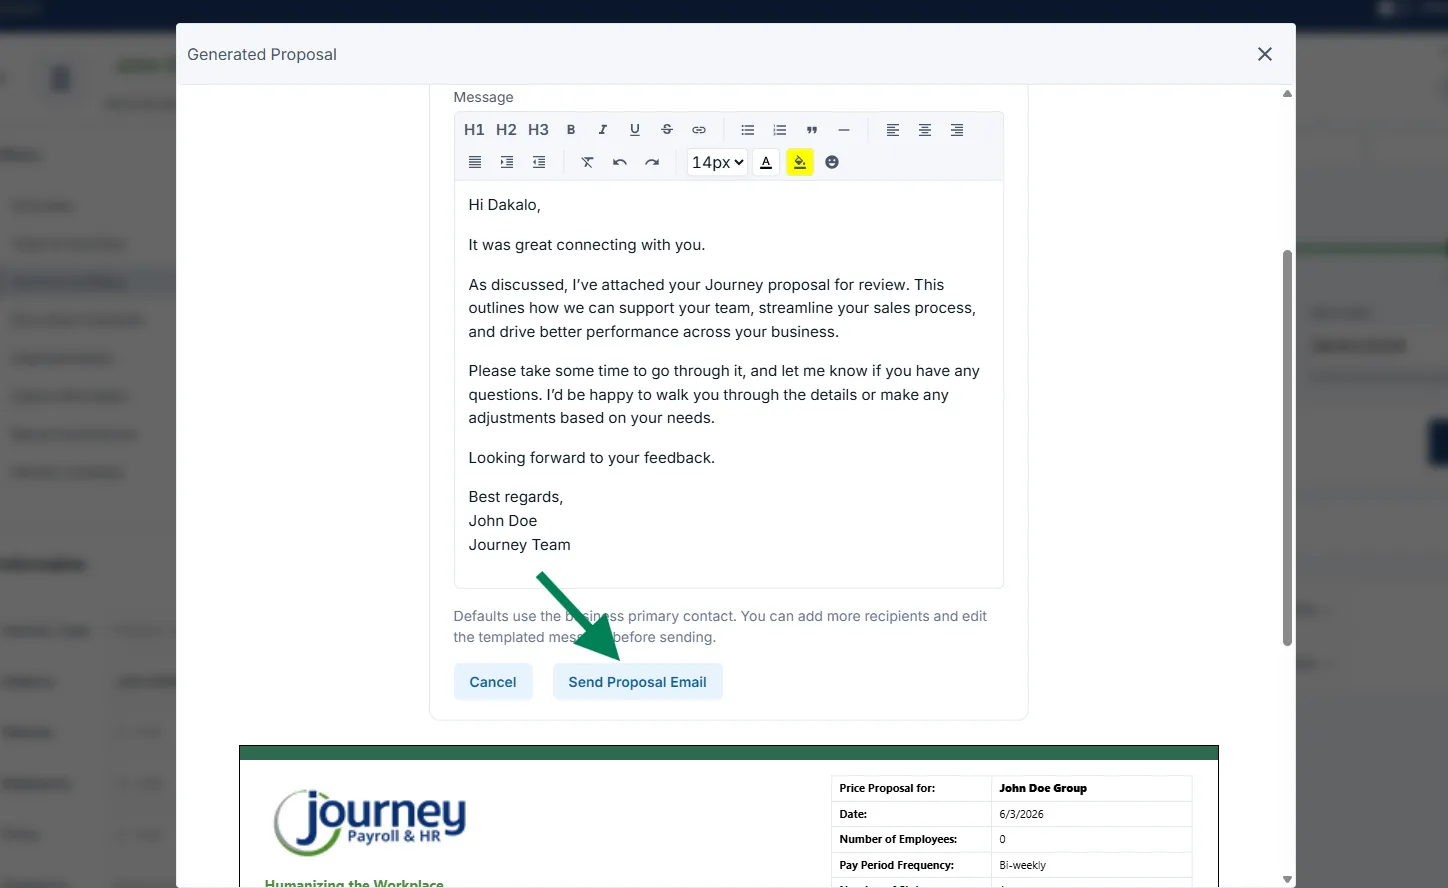
After the proposal details are correct, click Generate Document. The generated proposal opens in a preview window so the user can confirm the official proposal layout before sending it to the client.
The Email Proposal button opens the email form inside the generated proposal window. The message is prefilled with a client-ready template, and the user can edit the message before sending. Review the recipient, subject, and body, then click Send Proposal Email when ready.
The Download PDF button downloads the official proposal as a PDF. Use this when the proposal needs to be saved locally, attached manually, or reviewed outside JMS.
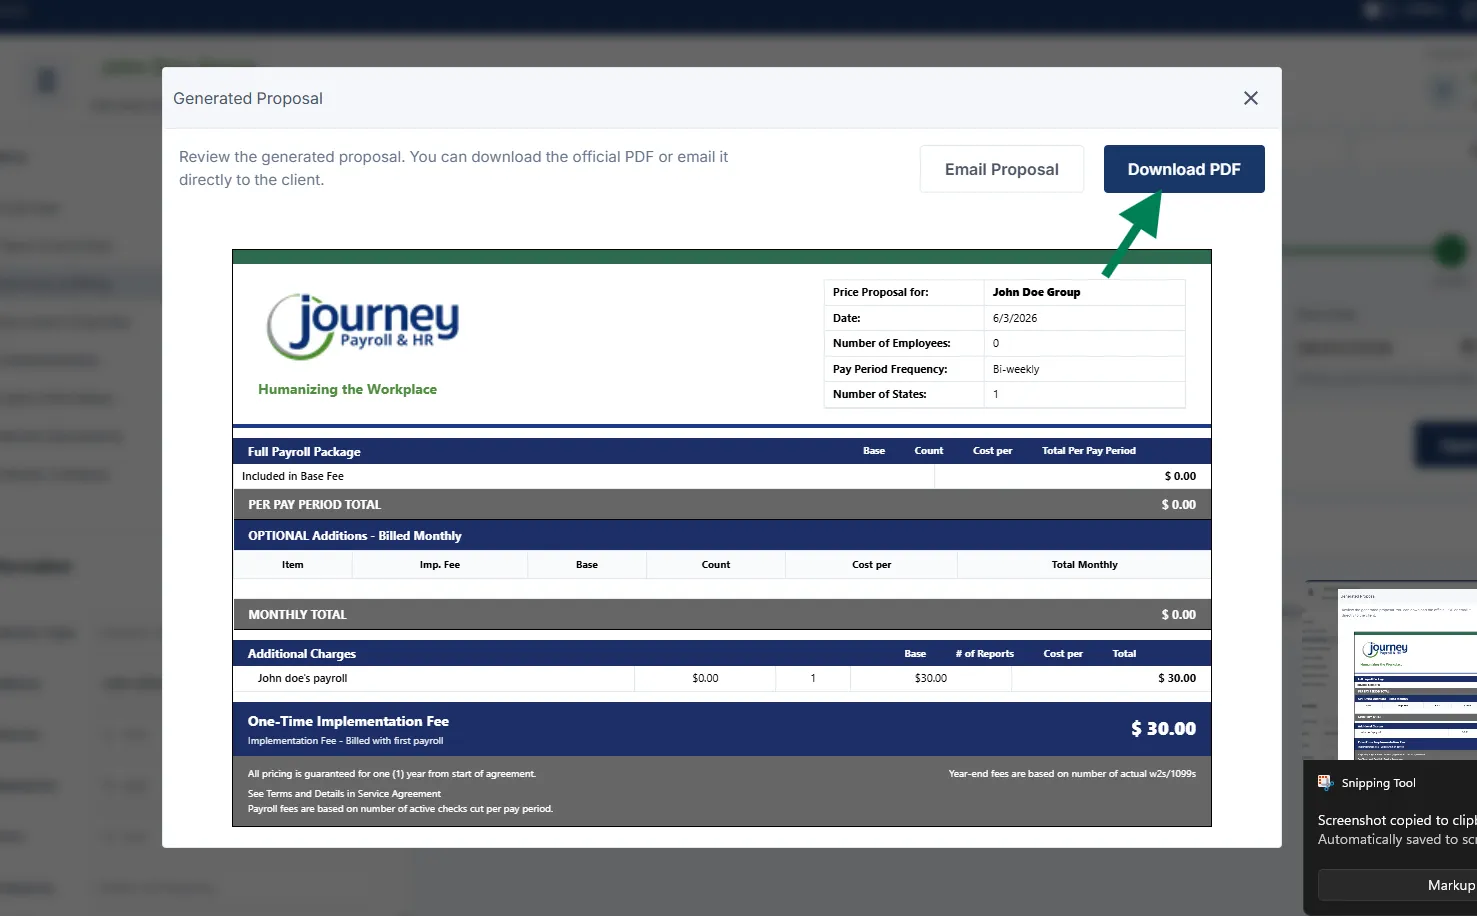
Use this section carefully because the selected services and pricing are what the client will see in the proposal.
Document checklist
Section titled “Document checklist”The Document Checklist section is used to track the client documents required before the business can move forward to implementation.
This checklist is important because it tells the team which payroll, HR, tax, banking, and authorization documents are needed for the client. The business should only be sent to implementation once the required documents have been reviewed and marked correctly.
Document checklist layout
Section titled “Document checklist layout”Documents are grouped into sections, such as:
- Agreements
- ACH Docs
- Power of Attorney Forms
- Federal ID Document
- Additional Documentation
- Prior Payrolls
Each document row includes the document type, whether it is required or optional, whether it has been received, the current status, comments, and a save action.
Required, optional, and received documents
Section titled “Required, optional, and received documents”Use the checkboxes to confirm the document requirement and progress:
- Required means the document is needed from the client.
- Optional means the document may be useful, but is not mandatory.
- Received means the client has already provided the document.
The Status dropdown is used to mark the document’s review state. If a document is missing, incorrect, or still pending, update the status and add a comment so the next user understands what is needed.
Comments and saving changes
Section titled “Comments and saving changes”The Comments field can be used to explain what is missing, what needs to be corrected, or any notes related to the document.
After making changes to a document row, use Save to store the update.
Sending to implementation
Section titled “Sending to implementation”Once the document checklist has been reviewed and the required documents are ready, the business can be moved forward by selecting Send to Implementation.
When the business is sent to implementation, the progress bar updates and a confirmation message appears. The implementation team will then review the checklist again before continuing with the onboarding process.
If something is missing or incorrect during the implementation review, the business may be sent back so the sales team can correct the outstanding items.
Implementation
Section titled “Implementation”The Implementation section is used by the implementation team to manage the onboarding process after the business has been sent from sales.
At this stage, the team completes a final review, assigns the correct implementation agent, and tracks onboarding tasks until the client is ready for first payroll.
Implementation progress
Section titled “Implementation progress”The progress bar shows the main implementation stages:
-
Double Check The implementation team reviews the client setup and confirms that the required information and documents are correct.
-
Onboarding The assigned implementation agent works through the onboarding checklist and updates each task as work is completed.
-
First Payroll Once onboarding is complete, the client moves toward the first payroll stage.
As each stage is completed, the step changes to a green checkmark.
Implementation checklist
Section titled “Implementation checklist”The Implementation Check List contains the tasks that must be completed during onboarding.
Each row includes:
- Title — the onboarding task that needs to be completed.
- Done — a checkbox to mark the task as completed.
- Status — the current progress of the task.
- Comment — notes about the task, blockers, or updates.
- Save — saves the changes made to that row.
Common checklist items may include tasks such as assigning the client number, submitting approvals, confirming company information, setting up deductions, importing data, and completing system setup items.
Updating checklist items
Section titled “Updating checklist items”For each checklist item, update the status as the work progresses. A task can be marked as complete using the Done checkbox, and comments can be added to explain what was completed or what still needs attention.
Use Save after updating a row so the checklist remains accurate for the rest of the team.
Assigning an implementation agent
Section titled “Assigning an implementation agent”Use Impl Agent to select the implementation agent responsible for the client.
The agent selection window shows useful details for each agent, including:
- Agent name and email
- Online or offline status
- Number of active implementations
- Active employee count
- Prior payroll count
- Next run date
This helps the team choose an agent based on workload, availability, and the complexity of the client.
After an agent is selected, the business can continue through the onboarding stage.
Completing implementation
Section titled “Completing implementation”Once the checklist has been completed and the onboarding work is finished, the progress bar can move through Onboarding and then to First Payroll.
The first payroll stage confirms that the client has reached the final implementation step before moving into the next part of the workflow.
Client Information
Section titled “Client Information”The Client Information section shows the main client details that were captured during the sales and implementation process.
This page is mainly used as a read-only reference point so the team can quickly confirm the client’s setup before or during onboarding.
The information is grouped into sections such as:
- Account Information
- Primary Address
- Payroll and employee details
- Charge information
- Industry or entry type
In the account section, you can review details such as the legal name, payroll frequency, active employee count, payroll base charge, per employee charge, number of states, number of locals, and other billing-related setup information.
The Primary Address panel shows the client’s saved address information, including address line, city, state or province, and postal code.
Use this page when you need to confirm that the business information matches what was collected earlier in the process.
Partner Contacts
Section titled “Partner Contacts”The Partner Contacts section shows partner-related contacts linked to the business.
This page includes a searchable table with columns for:
- Partner
- First name
- Last name
- Contact type
- Access
- Referring partner
If no partner contacts have been added yet, the table will show No records found.
Use this section to confirm whether any external partner contacts, referral contacts, or related partner users are connected to the business record.
Active Client and recent documents
Section titled “Active Client and recent documents”When a business reaches the Active Client stage, the progress tracker shows the final sales handoff steps as completed.
In this view, users can see that the business has moved through:
- Training
- Send to Specialist
The status dropdown shows the full journey stages:
- Prospect
- Qualified
- Obtaining Documents
- Implementation
- Active Client
This helps users confirm where the business currently sits in the overall sales and onboarding process.
Recent Documents
Section titled “Recent Documents”The Recent Documents section shows documents that have been uploaded or generated for the business.
The table includes:
- Document: The name of the document.
- Description: A short description, if one has been added.
- Uploaded: The date the document was uploaded.
- View icon: Opens the document for review.
In the example shown, the Client Checklist is listed as a recent document with an upload date of May 14, 2026.
Sending or resending the Magic Link
Section titled “Sending or resending the Magic Link”Users can click Send Magic Link or Resend Magic Link to send the client a link to the Document Portal.
After clicking the button, the system asks whether the user wants to open the Document Portal as well, or only send the link.
The user can choose:
- No, just send link: Sends the link without opening the portal.
- Yes, Open it: Sends the link and opens the Document Portal.
After the link is created and sent, a confirmation message appears: Document portal link created and email sent.
This confirms that the client has been sent access to the portal so they can upload or review the required documents.