
Help and Support - Marketing
The Help and Support panel is used to submit internal support requests from inside JMS.
Users can open this panel from the profile menu and choose the department that should handle their request.
For marketing-related requests, users should select Marketing.
Opening Help and Support
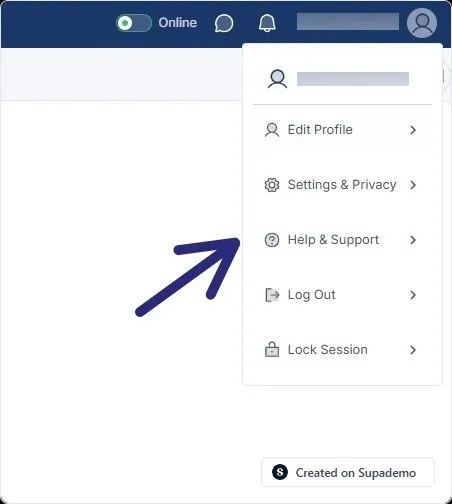
Section titled “Opening Help and Support”To open the Help and Support panel:
- Click the user profile menu in the top-right corner.
- Select Help & Support.
The Help and Support side panel opens on the right side of the screen.
Selecting a Department
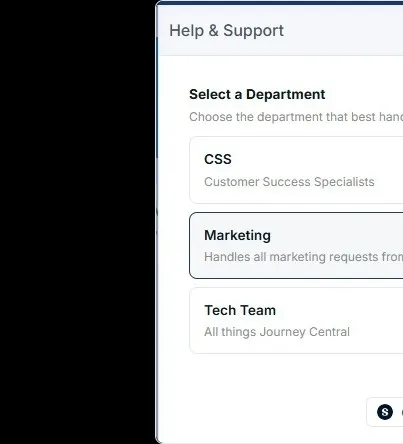
Section titled “Selecting a Department”The first step is to choose the department that best handles the request.
Available departments can include:
- CSS
- Marketing
- Tech Team
Select Marketing for requests related to marketing material, creative assets, email blasts, brochures, presentations, signage, or social media graphics.
Marketing Request Forms
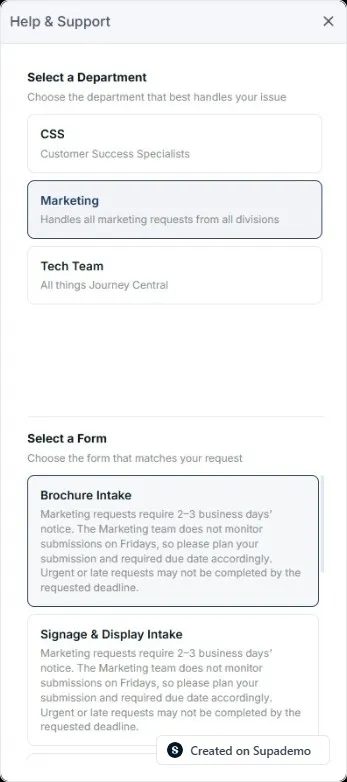
Section titled “Marketing Request Forms”After selecting Marketing, the panel shows the available marketing intake forms.
Users should choose the form that best matches the request.
Available marketing forms include:
- Brochure Intake
- Signage & Display Intake
- Social Media Graphic Intake
- Marketing Slick Intake
- PowerPoint Presentation Intake
- Email Blast Intake
Each form includes a note explaining that marketing requests require 2–3 business days’ notice.
The note also explains that the Marketing team does not monitor submissions on Fridays, so users should plan their submission and required due date accordingly.
Urgent or late requests may not be completed by the requested deadline.
Brochure Intake
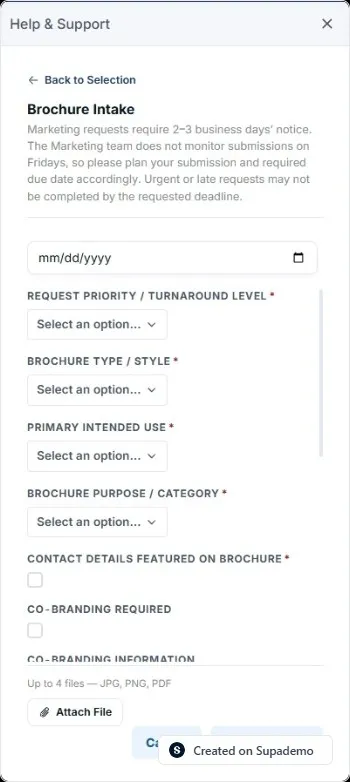
Section titled “Brochure Intake”The Brochure Intake form is used to request a brochure or brochure-related marketing project.
Add screenshot: Brochure Intake form
At the top of the form, users can select Back to Selection to return to the department and form selection screen.
Required Brochure Details
Section titled “Required Brochure Details”The form includes required fields that must be completed before submitting the ticket.
These fields include:
- Brochure / Project Title
- Target Due Date
- Request Priority / Turnaround Level
- Brochure Type / Style
- Primary Intended Use
- Brochure Purpose / Category
- Exact Text Copy & Image Placement
Required fields are marked with an asterisk.
Brochure / Project Title
Section titled “Brochure / Project Title”Use Brochure / Project Title to enter the name of the brochure or marketing project.
This should be clear and descriptive so the Marketing team can identify the request easily.
Target Due Date
Section titled “Target Due Date”Use Target Due Date to select the date when the brochure is needed.
The due date should allow enough time for the Marketing team to complete the work.
Marketing requests require 2–3 business days’ notice.
Request Priority / Turnaround Level
Section titled “Request Priority / Turnaround Level”Use Request Priority / Turnaround Level to indicate how quickly the request is needed.
Available options include:
- Standard (3+ business days)
- Rush/Emergency
Use Standard when the request allows normal turnaround time.
Use Rush/Emergency only when the request is urgent.
Brochure Type / Style
Section titled “Brochure Type / Style”Use Brochure Type / Style to select the format of the brochure.
Available options include:
- Standard Trifold (6 Panels / 8.5” x 11”)
- Standard Bifold (4 Panels / 8.5” x 11”)
- Custom / Other
Select the option that best matches the requested brochure format.
Primary Intended Use
Section titled “Primary Intended Use”Use Primary Intended Use to explain how the brochure will be used.
Available options include:
- Print-Ready PDF
- Digital / Email Attachment PDF
- Both Print-Ready & Digital PDF
This helps the Marketing team prepare the correct final format.
Brochure Purpose / Category
Section titled “Brochure Purpose / Category”Use Brochure Purpose / Category to describe the purpose of the brochure.
Available options include:
- Company Overview (General)
- Services Overview (Payroll & HR)
- Sales Pitch / Client Prospecting
- Community Event
- Collaboration / Partnership
- Other (Please specify in notes)
Choose the option that best describes the goal of the brochure.
Contact Details Featured on Brochure
Section titled “Contact Details Featured on Brochure”Use Contact Details Featured on Brochure when contact information should appear on the brochure.
Select the checkbox if the brochure needs to include contact details.
Co-Branding
Section titled “Co-Branding”The form includes co-branding fields for requests that require another brand, partner, or company to be included.
Fields include:
- Co-Branding Required
- Co-Branding Information
- Co-Branding Assets
Select Co-Branding Required if the brochure needs to include another brand.
Use Co-Branding Information to explain what branding needs to be included.
Use Co-Branding Assets to upload any related logos or files.
Exact Text Copy and Image Placement
Section titled “Exact Text Copy and Image Placement”Use Exact Text Copy & Image Placement to provide the wording and layout instructions for the brochure.
This field should include the exact text that should appear on the brochure and where images or sections should be placed.
Users can also attach supporting files.
Accepted file types include:
- JPG
- PNG
Up to 4 files can be attached.
Image and Asset Uploads
Section titled “Image and Asset Uploads”Use Image / Asset Uploads to attach images, logos, PDFs, or other supporting files for the brochure.
Accepted file types include:
- JPG
- PNG
Up to 4 files can be attached.
Additional Notes or Missed Details
Section titled “Additional Notes or Missed Details”Use Additional Notes / Missed Details to add any extra information that was not covered in the other fields.
This can include:
- Special instructions
- Missing information
- Design preferences
- Deadline notes
- Context for the Marketing team
Users can also attach additional supporting files if needed.
Attaching Files
Section titled “Attaching Files”Some sections allow users to upload supporting files.
To upload a file, click Attach File.
Files may be used for:
- Co-branding assets
- Exact copy and layout references
- Images or design assets
- Additional notes or supporting documents
Accepted file types are usually shown under the upload section.
Submitting the Ticket
Section titled “Submitting the Ticket”After all required fields are complete, click Submit Ticket.
Click Cancel to close the form without submitting the request.
Once submitted, the request is sent to the Marketing team for review.
Important Notes for Marketing Requests
Section titled “Important Notes for Marketing Requests”Marketing requests require 2–3 business days’ notice.
The Marketing team does not monitor submissions on Fridays, so users should plan their submission and required due date carefully.
Urgent or late requests may not be completed by the requested deadline.
Signage & Display Intake
Section titled “Signage & Display Intake”The Signage & Display Intake form is used to request signage, display materials, or other visual marketing assets.
Use this form when Marketing needs to create or prepare signage for events, offices, displays, vendor setups, or branded spaces.
Add screenshot: Signage & Display Intake form
Like other marketing request forms, signage requests require 2–3 business days’ notice.
The Marketing team does not monitor submissions on Fridays, so users should plan their submission and required due date carefully.
Urgent or late requests may not be completed by the requested deadline.
Required Signage Details
Section titled “Required Signage Details”The Signage & Display Intake form includes required fields that must be completed before submitting the ticket.
These fields include:
- Signage Title / Project Name
- Target Due Date
- Display Date
- Request Priority / Turnaround Level
- Signage Type & Dimensions
- Signage Purpose / Category
- Contact Details Featured on Sign
- Exact Text / Copy on Sign
- Vendor Template / Spec Sheet Upload
- Supporting Image / Logo Uploads
- Image Placement Instructions
Required fields are marked with an asterisk.
Signage Title / Project Name
Section titled “Signage Title / Project Name”Use Signage Title / Project Name to enter the name of the signage request.
This should clearly describe what is being requested, such as the event name, display name, or signage purpose.
Target Due Date
Section titled “Target Due Date”Use Target Due Date (Design Completion) to select when the design needs to be completed.
This date should allow enough time for design review, printing, vendor preparation, or setup.
Display Date
Section titled “Display Date”Use Display Date to select the date when the signage will be used or displayed.
This helps the Marketing team understand the final deadline and plan the request correctly.
Request Priority / Turnaround Level
Section titled “Request Priority / Turnaround Level”Use Request Priority / Turnaround Level to indicate how urgent the request is.
Available options can include:
- Standard
- Rush/Emergency
Use Standard when the request allows normal turnaround time.
Use Rush/Emergency only when the request is urgent.
Signage Type and Dimensions
Section titled “Signage Type and Dimensions”Use Signage Type & Dimensions to describe the type and size of signage needed.
Examples can include:
- Banner
- Pull-up banner
- Poster
- Table display
- Window decal
- Directional signage
- Custom display item
Users should include the exact dimensions if available.
Supporting files can also be attached in this section.
Accepted file types include:
- JPG
- PNG
Up to 4 files can be attached.
Signage Purpose / Category
Section titled “Signage Purpose / Category”Use Signage Purpose / Category to explain what the signage will be used for.
This helps the Marketing team understand the context and prepare the correct design style.
Examples can include:
- Event signage
- Office display
- Promotional signage
- Directional signage
- Sales or client-facing display
- Internal communication display
Contact Details Featured on Sign
Section titled “Contact Details Featured on Sign”Use Contact Details Featured on Sign when contact information should appear on the signage.
Select the checkbox if the sign must include contact details such as a phone number, email address, website, or staff contact.
Co-Branding Required
Section titled “Co-Branding Required”Use Co-Branding Required when another brand, partner, vendor, or company needs to appear on the sign.
Select the checkbox if co-branding is required.
If co-branding is needed, attach any related brand assets in the Co-Branding Assets section.
Co-Branding Assets
Section titled “Co-Branding Assets”Use Co-Branding Assets to upload logos or other brand files that must be included in the signage.
Accepted file types include:
- JPG
- PNG
Up to 4 files can be attached.
Exact Text or Copy on Sign
Section titled “Exact Text or Copy on Sign”Use Exact Text / Copy on Sign to provide the wording that must appear on the signage.
This field should include the final text or message exactly as it should appear.
Users should check spelling, names, dates, and contact details before submitting.
QR Code Attachment
Section titled “QR Code Attachment”Use QR Code Attachment if the signage needs to include a QR code.
Attach the QR code file or any document that explains where the QR code should link.
Accepted file types include:
- JPG
- PNG
Up to 4 files can be attached.
Vendor Template or Spec Sheet Upload
Section titled “Vendor Template or Spec Sheet Upload”Use Vendor Template / Spec Sheet Upload to attach any vendor templates, print specifications, sizing guides, or production requirements.
This field is required when signage must follow a vendor’s layout, size, or print format.
Accepted file types include:
- JPG
- PNG
Up to 4 files can be attached.
Supporting Image or Logo Uploads
Section titled “Supporting Image or Logo Uploads”Use Supporting Image / Logo Uploads to attach any images, logos, icons, or visual assets that should be used in the signage.
This field is required.
Accepted file types include:
- JPG
- PNG
Up to 4 files can be attached.
Image Placement Instructions
Section titled “Image Placement Instructions”Use Image Placement Instructions to explain where images, logos, QR codes, or design elements should appear on the sign.
For example, users can specify whether a logo should appear at the top, bottom, left, right, or center of the design.
Clear placement instructions help reduce revisions.
Additional Notes or Missed Details
Section titled “Additional Notes or Missed Details”Use Additional Notes / Missed Details to include any extra information that was not covered in the other fields.
This can include:
- Event details
- Vendor notes
- Printing instructions
- Design preferences
- Deadline context
- Special placement instructions
Users can also attach supporting files if needed.
Submitting the Signage Request
Section titled “Submitting the Signage Request”After all required fields are complete, click Submit Ticket.
Click Cancel to close the form without submitting the request.
Once submitted, the ticket is sent to the Marketing team for review.