
Partner Overview
Use this page to review partner details, track activity, manage communication, and configure revenue share.
The top of the page shows the partner name. In this example, the selected partner is JOHN DOE GROUP.
Information panel
Section titled “Information panel”On the left side, the Information panel shows the main partner details.
This includes:
Partner Type Shows what type of partner this is, such as Attorney, Broker, Accountant, Consultant, or Bookkeeper. Address Shows the partner’s saved business address. Website Allows a website to be added if one is available. Employees Shows the number of employees linked to the partner profile. Revenue Share Shows whether revenue share is enabled for this partner.
When Revenue Share is selected, the Configure button appears. Use this button to set up the partner’s revenue share agreement.
Partner menu
Section titled “Partner menu”The partner record has a menu on the left side.
The available sections include:
Overview Linked Businesses & Report Tasks Contacts
Use this menu to move between the different parts of the partner profile.
Journey Team
Section titled “Journey Team”The Journey Team section shows users who are connected to this partner record.
Each team member displays their name and email address.
Use Add New to add another team member to the partner record.
The three-dot menu next to a team member can be used to manage that person’s role or remove them from the partner team.
Summary
Section titled “Summary”The Summary area is used to add important notes about the partner.
Click Add to enter a summary note.
This is useful for recording key information such as:
- Partner background
- Agreement details
- Important relationship notes
- Follow-up context
Timeline, Meetings, and Emails
Section titled “Timeline, Meetings, and Emails”The middle section includes three tabs:
Timeline Meetings Emails
The Timeline tab shows activity history for the partner record. In this example, it shows updates where the partner type changed.
Use this section to review what has changed on the partner record and when the change happened.
The Meetings tab is used to review meeting activity.
The Emails tab is used to review email communication connected to the partner.
Comments
Section titled “Comments”The Comments panel is on the right side of the overview.
Use New Comment to add a comment to the partner record.
Comments are useful for internal updates, reminders, or notes that other users should see when they open the partner.
Actions menu
Section titled “Actions menu”The Actions button in the top-right corner gives quick access to partner actions.
The available actions include:
- Video Call
- Call
- Remove
Use these actions to contact the partner or remove the partner record when needed.
Remove should only be used when the partner record is no longer needed.
Configuring Revenue Share for a Partner
Section titled “Configuring Revenue Share for a Partner”The Revenue Share option is used when a partner must receive commission or payment for business they refer.
On the partner record, you will see a Revenue Share checkbox in the left information panel. When this option is enabled, the Configure button becomes available.
Click Configure to open the Configure Revenue Share window.
There are two types of revenue share agreements:
- % Based Agreement
- Fixed Fee Agreement
% Based Agreement
Section titled “% Based Agreement”Use % Based Agreement when the partner should receive a percentage of selected services.
In this setup, the user can choose which services are included in the revenue share calculation.
The window shows a list of available services, such as:
- Accident Reporting Monthly Base
- ATS Lite Monthly Base
- ATS Lite Monthly PEPM
- Labor Law E-Posters
- Retirement services
- Workers Comp services
- IT Support
- Other configured services
After selecting the services, enter the percentage value in the Value field.
For example, if the partner should receive 10% of the selected service revenue, enter 10 in the value field.
Click Ok to save the percentage-based revenue share setup.
Fixed Fee Agreement
Section titled “Fixed Fee Agreement”Use Fixed Fee Agreement when the partner should receive a set amount instead of a percentage.
This option allows the user to configure fixed values such as:
- Per Payroll Fee
- Per Employee Fee
The user can select which fixed fee applies and then enter the amount.
For example:
- A fixed amount per payroll run
- A fixed amount per employee
Click Ok to save the fixed fee agreement.
When to use Revenue Share
Section titled “When to use Revenue Share”Use the revenue share setup when a partner is entitled to payment for referred or linked business.
This helps the team track partner agreements clearly and makes it easier to calculate payments based on the correct method.
Use % Based Agreement when the partner earns a percentage of service revenue.
Use Fixed Fee Agreement when the partner earns a set amount regardless of the service revenue.
Linked Businesses & Report
Section titled “Linked Businesses & Report”The Linked Businesses & Report section shows the businesses connected to the selected partner.
Use this section to review how many businesses the partner has referred, the revenue connected to those businesses, and the revenue share calculated for the partner.
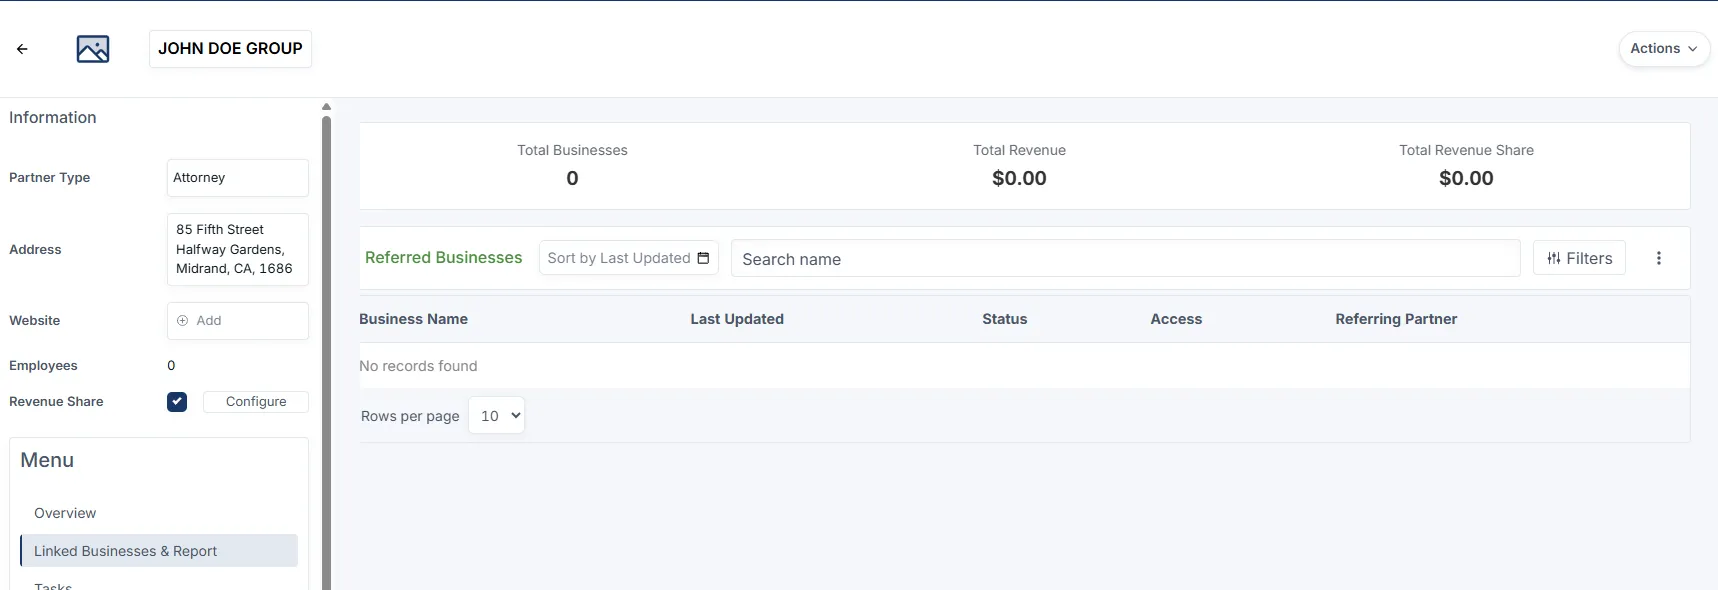
At the top of this section, you will see three summary totals:
- Total Businesses: Shows how many businesses are linked to this partner.
- Total Revenue: Shows the total revenue generated from the linked businesses.
- Total Revenue Share: Shows the total revenue share amount connected to this partner.
Below the summary totals is the Referred Businesses table.
This table includes:
- Business Name
- Last Updated
- Status
- Access
- Referring Partner
Use the Search name field to quickly find a specific linked business.
Use Sort by Last Updated to organize the list by the most recently updated businesses.
Use Filters to narrow the list by business status.
The available status filter options may include:
- All Options
- Closed Won
- 100%
- Lost
This helps users quickly focus on businesses that are completed, still in progress, or no longer moving forward.
Adding a linked business
Section titled “Adding a linked business”To link a new business to the partner, click the three-dot menu and select Add New.
This opens the Partner Link Business Form.
From this form, search for the business you want to link and select it from the dropdown list.
Each business option shows the business name and its current status, such as Implementation or Active Client.
Once selected, the business becomes connected to the partner and can be included in the referred business report.
Partner Tasks
Section titled “Partner Tasks”The Tasks section shows tasks connected to the selected partner.
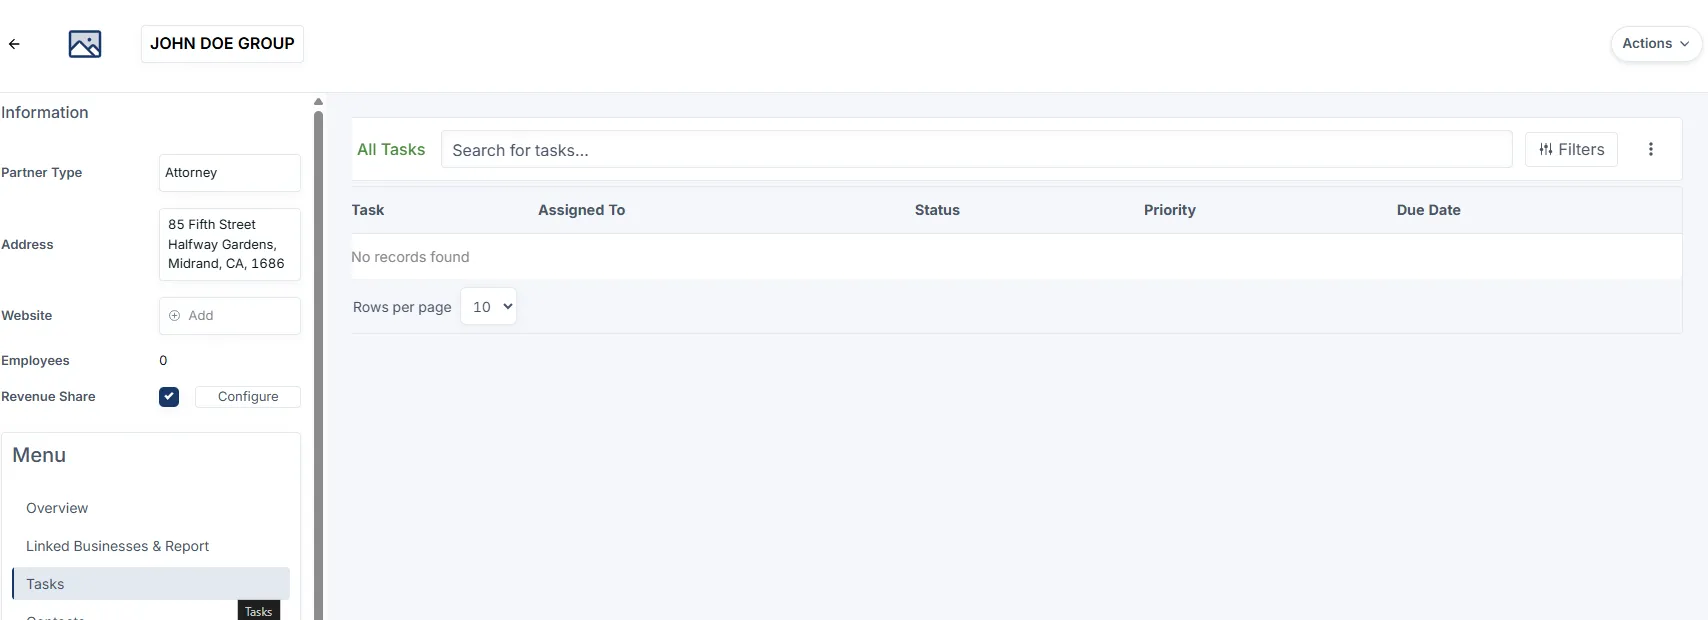
Use this section to track work that still needs to be completed for the partner.
The task table includes:
- Task
- Assigned To
- Status
- Priority
- Due Date
Use the Search for tasks field to quickly find a task.
Use Filters to narrow the task list by task details such as status, priority, assignee, or due date.
The three-dot menu can be used to create or manage tasks.
If there are no tasks, the table will show No records found.
Partner Contacts
Section titled “Partner Contacts”The Contacts section shows contacts connected to the selected partner.
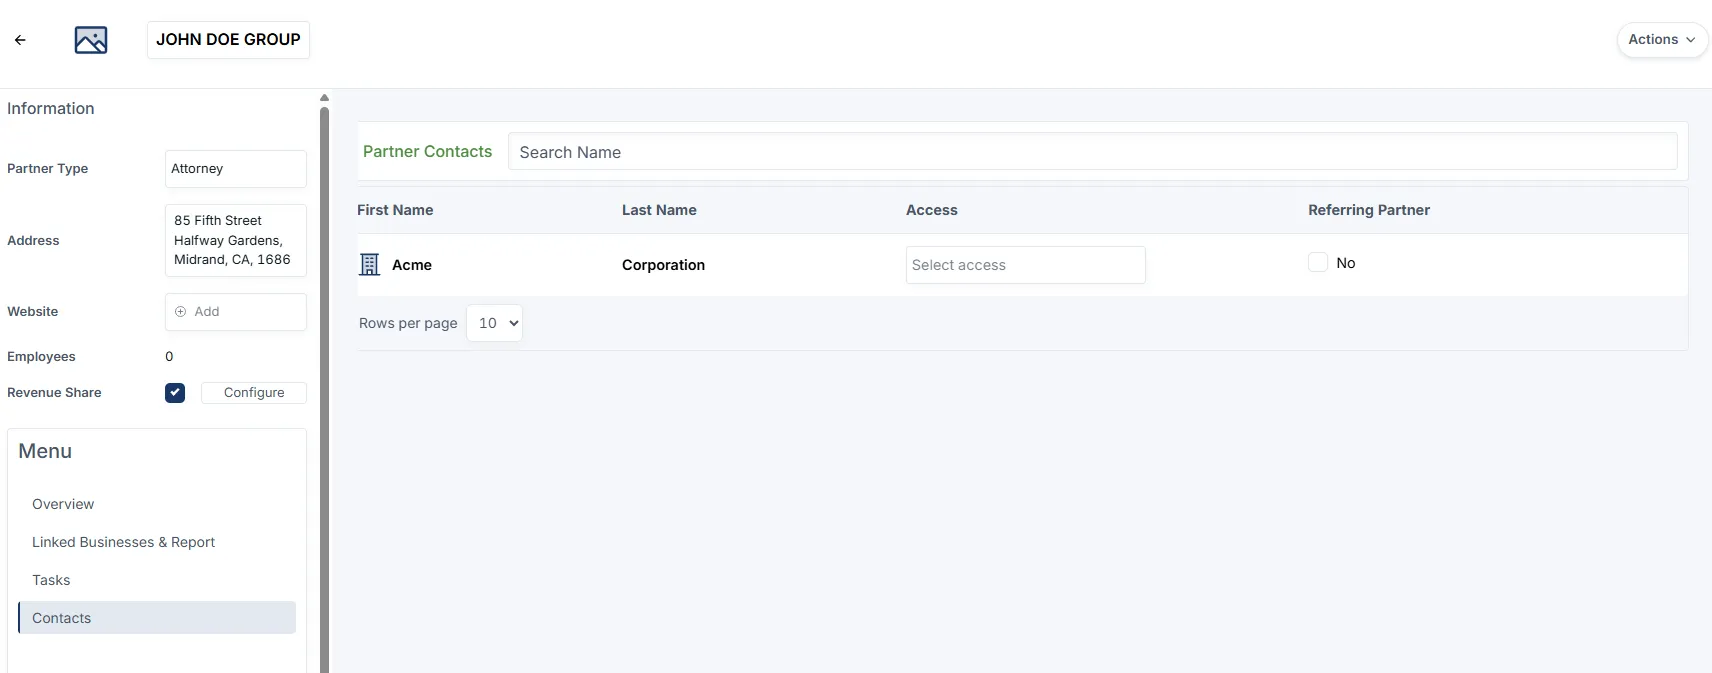
Use this section to manage people who are associated with the partner company.
The contacts table includes:
- First Name
- Last Name
- Access
- Referring Partner
The Access dropdown is used to choose what type of access the contact should have.
The Referring Partner checkbox is used to mark whether the contact is the referring partner.
Use the Search Name field to find a specific contact quickly.
If contacts are already linked, they will appear in the table. In this example, Acme Corporation is listed as a partner contact.
Communication Preferences
Section titled “Communication Preferences”From the Partner Contacts section, users can manage how a partner contact receives communication.
When a contact’s communication preferences are opened, a modal appears for that specific contact. In this example, the modal is for Acme Corporation.
Inside the modal, users can update two main areas:
Delivery Channels
Section titled “Delivery Channels”The Delivery Channels section controls how communication should be sent to the contact.
Available options include:
- SMS
Users can tick or untick these options depending on how the contact should receive messages.
Subscription Preferences
Section titled “Subscription Preferences”The Subscription Preferences section controls whether the contact is subscribed to a specific communication sequence or campaign.
Users can use the toggle to turn the subscription on or off.
After making changes, click Save Changes to apply the updated preferences.
Use Cancel to close the modal without saving.